
You know those hectic mornings when breakfast feels impossible? I’ve been there too – rushing out the door with just coffee in hand, only to crash by mid-morning. That’s why I fell in love with these magical 3-ingredient protein bagels. They’re my weekday breakfast savior, ready in under 30 minutes from bowl to belly!
The first time I tried making protein bagels, I couldn’t believe something so simple could taste this good. Just flour, yogurt, and a scoop of protein powder (if you’re feeling fancy) transform into chewy, satisfying bagels that keep me full until lunch. No yeast, no kneading, no fancy equipment – just mix, shape, and bake.
What I love most (besides the protein boost) is how forgiving the recipe is. My first batch was lumpy and uneven, but still delicious! Now these golden-brown beauties are my go-to for quick breakfast meal prep. They toast up perfectly and take any topping from cream cheese to avocado like champs. Trust me, once you try these, you’ll never look at store-bought bagels the same way again.
Table of Contents

Why You’ll Love These 3-Ingredient Protein Bagels
Let me tell you why this recipe has become my breakfast game-changer:
- Speed demon: From measuring ingredients to pulling them out of the oven, you’re looking at just 30 minutes. Perfect for those “I woke up late again” mornings.
- Protein punch: That scoop of protein powder (or just the yogurt alone) keeps me satisfied way longer than my usual toast. No more 10:30am stomach growls!
- Pantry-friendly: Flour and yogurt are staples I always have. No last-minute grocery runs for obscure ingredients.
- Endless options: Top them sweet with jam or go savory with eggs – they handle everything like champs.
- Beginner-proof: If I can make these (and trust me, I’m no baker), anyone can. No fancy skills required!
The best part? My kids don’t even realize they’re eating something good for them. Total mom win! For another unique morning idea, try our Breakfast Sushi Bake Recipe a creative twist on breakfast.
Ingredients for 3-Ingredient Protein Bagels
Here’s everything you’ll need for these ridiculously easy bagels (and yes, I’ve learned these specifics matter!):
- 1 cup self-rising flour (pack it gently – don’t compress it like you’re making snowballs!)
- 1 cup Greek yogurt (I use non-fat, but full-fat works too for extra richness)
- 1 scoop vanilla protein powder (optional, but I always add it for that extra morning boost)
That’s it – seriously! Though I sometimes toss in a pinch of salt if my yogurt’s really plain. The flour must be self-rising though – trust me, I learned that lesson the flat-bagel way.
How to Make 3-Ingredient Protein Bagels
Alright, let’s get these beauties baking! I promise it’s easier than you think – my 8-year-old could practically do it (and sometimes does when she’s feeling helpful). Just follow these simple steps, and you’ll have warm, toasty bagels before your coffee gets cold.
Print
3-Ingredient Protein Bagels: Easy & Magical Breakfast Hack
- Total Time: 30 minutes
- Yield: 4 bagels 1x
- Diet: Low Fat
Description
Simple protein bagels made with just three ingredients.
Ingredients
- 1 cup self-rising flour
- 1 cup Greek yogurt
- 1 scoop protein powder (optional)
Instructions
- Preheat oven to 375°F (190°C).
- Mix all ingredients in a bowl until dough forms.
- Divide dough into 4 equal parts and shape into bagels.
- Place on a baking sheet lined with parchment paper.
- Bake for 20-25 minutes until golden brown.
Notes
- Use non-fat Greek yogurt for lower calories.
- Add toppings like sesame seeds before baking.
- Prep Time: 5 minutes
- Cook Time: 25 minutes
- Category: Breakfast
- Method: Baking
- Cuisine: American
Nutrition
- Serving Size: 1 bagel
- Calories: 180
- Sugar: 2g
- Sodium: 300mg
- Fat: 1g
- Saturated Fat: 0.5g
- Unsaturated Fat: 0.5g
- Trans Fat: 0g
- Carbohydrates: 30g
- Fiber: 1g
- Protein: 12g
- Cholesterol: 5mg
Keywords: protein bagels, easy breakfast, healthy snacks
Step 1: Mixing the Dough
First things first – preheat that oven to 375°F (190°C). While it’s heating up, grab a big mixing bowl and dump in your flour. Make a little well in the center and plop in the Greek yogurt. If you’re using protein powder, add that now too.
Now comes the fun part – get your hands in there! Start mixing everything together until it forms a shaggy dough. It’ll seem too dry at first, but keep working it – after about 2 minutes of kneading, it should come together into a smooth ball that’s slightly sticky but not wet. If it’s sticking to your fingers like crazy, add a tiny bit more flour (like a teaspoon at a time).
Step 2: Shaping the Bagels
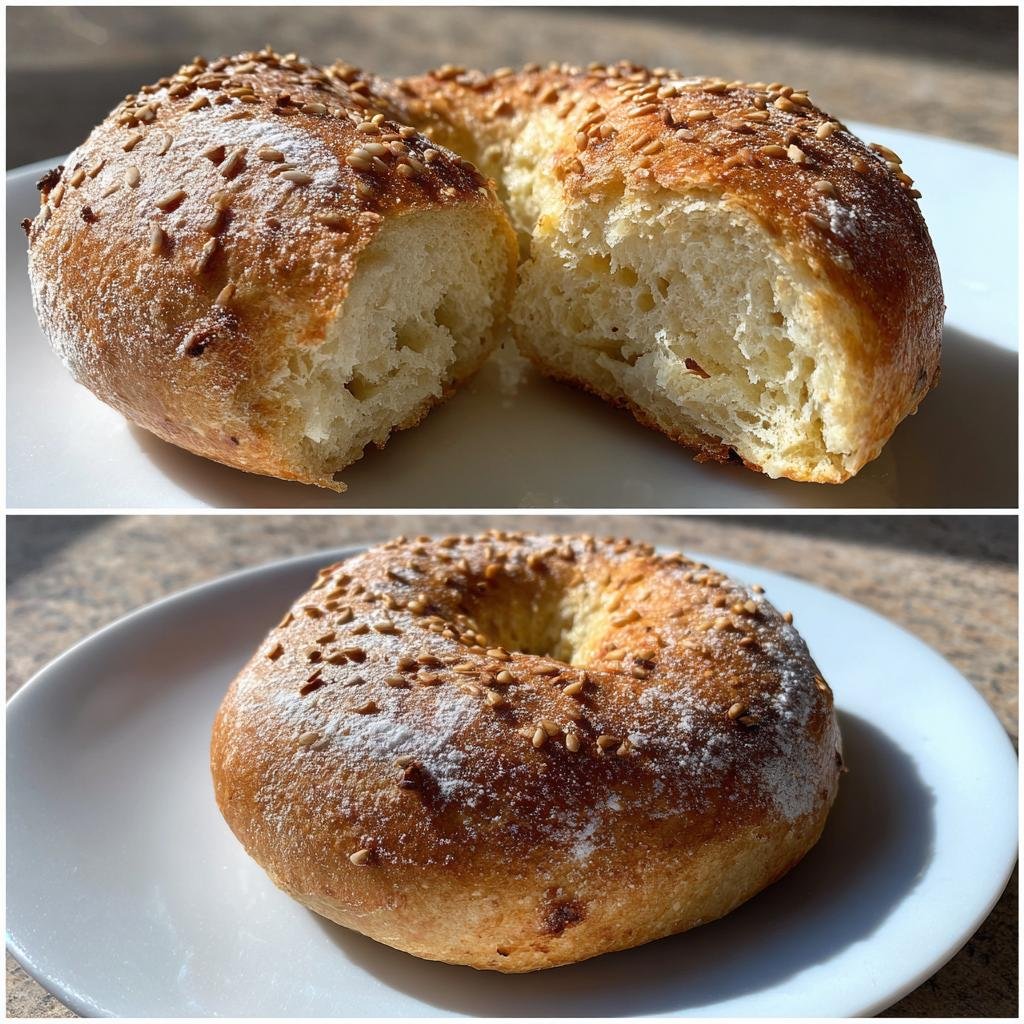
Lightly flour your counter and turn out the dough. Divide it into 4 equal parts – I use a knife to cut it like a pizza for accuracy. Now, roll each piece into a log about 6 inches long, then pinch the ends together to form a ring.
Pro tip: If your bagels look a little wonky (mine always did at first!), wet your fingertips and smooth out the seams. They don’t need to be perfect – rustic is charming! Just make sure the hole in the center is at least 1-inch wide, or it’ll disappear while baking.
Step 3: Baking to Perfection
Line a baking sheet with parchment paper (trust me, it’s worth it for easy cleanup) and arrange your bagels with some breathing room. Pop them in the oven for 20-25 minutes. Around the 20-minute mark, start peeking – you want them golden brown on top with a slightly crisp exterior.
When they’re done, let them cool for at least 5 minutes before digging in (if you can wait that long!). They’ll firm up as they cool, developing that perfect chewy bagel texture we all love. The smell in your kitchen right now? That’s the smell of breakfast victory!
Tips for Perfect 3-Ingredient Protein Bagels
After burning more bagels than I’d like to admit (RIP, first three batches), I’ve picked up some foolproof tricks that’ll guarantee bakery-worthy results every time:
- Parchment is your BFF: Skip the greased pan – parchment paper prevents sticking without extra oil. Bonus? Zero scraping stuck-on bits later!
- The thumbprint test: Press lightly on a cooled bagel – it should spring back slowly. If it stays indented, bake 2 more minutes.
- Egg wash magic: For extra shine, brush with beaten egg before baking. My kids love when I sprinkle everything bagel seasoning on top!
- Yogurt matters: Thick Greek yogurt works best. If yours seems watery, strain it through cheesecloth for 10 minutes first.
- Cool completely: Resist cutting warm! They firm up perfectly at room temp – about 15 minutes of patience pays off.
Remember – even “ugly” bagels taste amazing toasted with cream cheese. No one’s judging!
Variations for 3-Ingredient Protein Bagels
Once you’ve mastered the basic recipe (which, let’s be honest, takes all of one try), it’s time to get creative! I love playing with different flavors depending on my mood. Here are my favorite ways to mix things up:
- Sweet cinnamon raisin: Add 1 tsp cinnamon and ¼ cup raisins to the dough – tastes like a cozy morning in bagel form!
- Everything spice: Press the shaped bagels into a mix of sesame seeds, poppy seeds, garlic, and onion powder before baking.
- Chocolate chip treat: Stir in ¼ cup mini chocolate chips for when you want dessert for breakfast (no judgment here!).
- Savory herb: Mix in 1 tsp dried rosemary or everything bagel seasoning for an extra flavor punch.
The best part? You can make different flavors in one batch – I often do half cinnamon, half plain for my picky eaters. The dough is basically flavor play-doh!
Serving Suggestions for 3-Ingredient Protein Bagels
Oh, the possibilities! My protein bagels are like blank canvases waiting for your favorite toppings. For mornings when I’m feeling virtuous, I slather them with almond butter and banana slices. When I want something savory, nothing beats smoked salmon with cream cheese and capers. Kids in our house love them toasted with strawberry jam – the perfect sweet crunch!
Storage and Reheating Instructions
These protein bagels keep like champs! Once cooled completely, stash them in an airtight container at room temp for 2 days or refrigerate for up to 5 days. For that fresh-from-the-oven feel, I pop them in the toaster for 1-2 minutes – the edges get delightfully crisp while staying soft inside. You can also microwave for 15 seconds if you’re in a real hurry (though toasting’s better!).
Nutritional Information for 3-Ingredient Protein Bagels
Now, I’m no nutritionist, but here’s the scoop on what you’re getting with these protein-packed beauties (based on my typical ingredients):
- About 180 calories per bagel
- A solid 12g protein to power your morning
- Just 1g fat (with non-fat yogurt)
- 30g carbs for energy
Keep in mind – these numbers can change depending on your specific yogurt brand or protein powder. My chocolate chip version? Well… let’s just say those numbers shift slightly (but totally worth it for that melty chocolate goodness!). Explore more creative recipes and updates by following us on Facebook.
Frequently Asked Questions
I get asked about these protein bagels all the time – here are answers to the questions that pop up most:
Can I use regular flour instead of self-rising?
Oh honey, I learned this one the hard way! Regular flour needs added baking powder (about 1½ tsp per cup) to get that perfect rise. Self-rising flour already has it mixed in, which is why I swear by it. Your bagels will turn out flat as pancakes without it!
How much protein is actually in each bagel?
With the yogurt and optional protein powder, you’re looking at about 12g protein per bagel. That’s more than two eggs! The exact amount changes slightly depending on your yogurt brand and whether you use protein powder, but it’s always a solid breakfast boost.
Can I make these gluten-free?
Absolutely! I’ve had great success with gluten-free self-rising flour blends. Just check that your protein powder is GF too if that’s a concern. The texture comes out slightly denser but still delicious.
Why is my dough so sticky?
Don’t panic! Different yogurt brands vary in thickness. If it feels like glue, sprinkle in a teaspoon more flour at a time until it’s workable. And pro tip – wet hands help with shaping sticky dough!
Can I freeze these protein bagels?
You bet! They freeze beautifully for up to 2 months. I slice them first so I can pop halves straight into the toaster from frozen – no thawing needed. Perfect for emergency breakfasts!