
Oh my goodness, have I got a winner for you! This baked sweet and sour chicken recipe has been my go-to weeknight lifesaver for years – it’s the perfect combo of crispy, tangy, and just sweet enough. My kids literally cheer when they smell it baking, and honestly? I don’t blame them.
I’ll never forget the first time I made this version – I’d been craving takeout but wanted something healthier. After a few disastrous attempts at frying (let’s just say my smoke detector got quite the workout), I discovered the magic of baking. The cornstarch coating gives you that crave-worthy crunch without all the oil, and the homemade sauce? So much better than the neon orange gloop from restaurants.
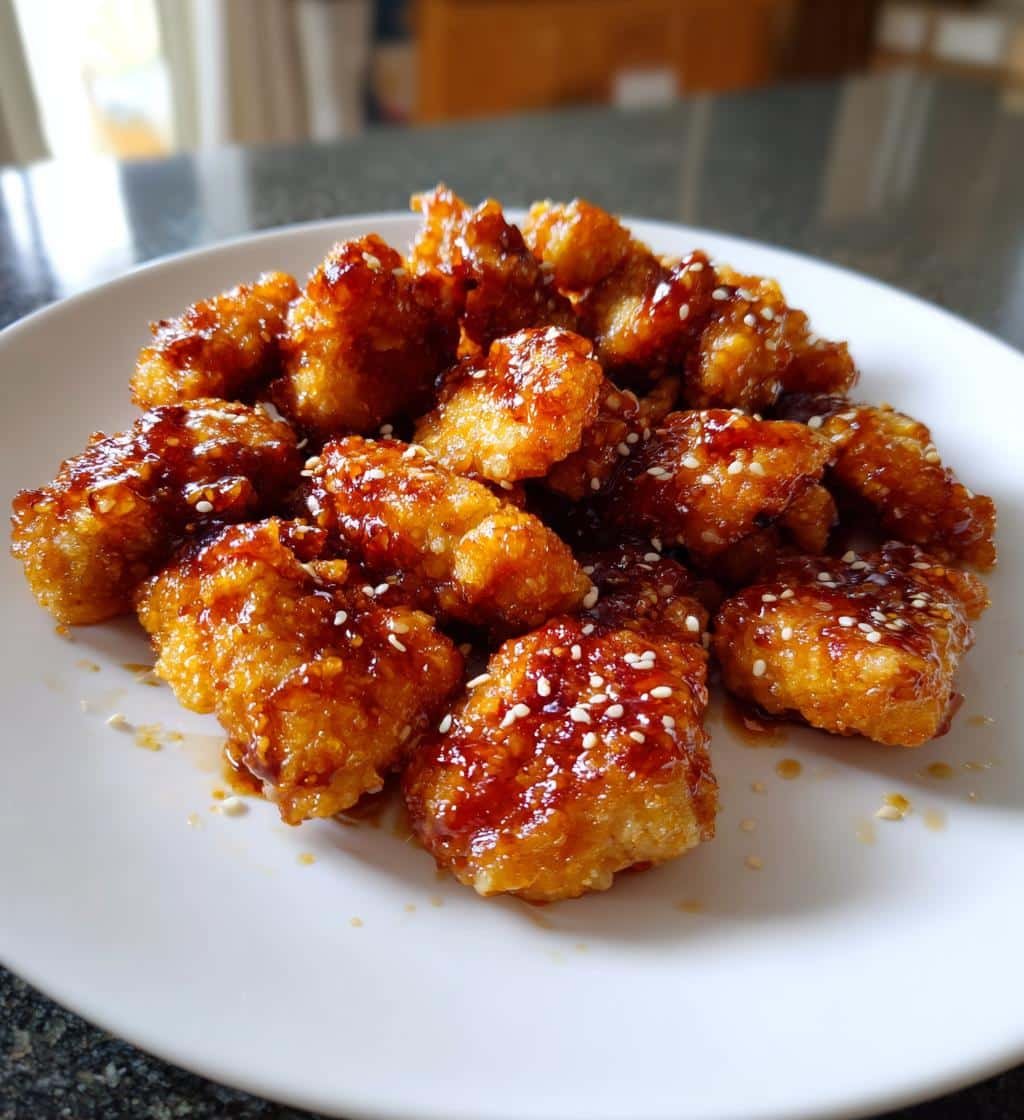
What I love most is how the sauce caramelizes in the oven, clinging to every piece of chicken with that perfect balance of sweet and sour. It’s one of those rare recipes where “easy” doesn’t mean “compromising on flavor.” Trust me, once you try this baked sweet and sour chicken, you’ll never go back to soggy takeout containers again!
Why You’ll Love This Baked Sweet and Sour Chicken Recipe
This isn’t just another chicken recipe – it’s the one you’ll keep coming back to week after week. Here’s why:
- That irresistible crunch: The cornstarch coating bakes up crispy without deep frying (no greasy fingers!)
- Sauce that actually tastes homemade: No artificial flavors – just the perfect balance of sweet and tangy
- Weeknight magic: From fridge to table in about an hour (most of it hands-off baking time)
- Healthier than takeout: All the flavor with way less oil and preservatives
- Kid-approved: My picky eaters gobble this up faster than chicken nuggets
- Leftovers that stay crispy: Unlike fried versions, the coating stays delicious when reheated
Seriously, this recipe checks all the boxes – easy, flavorful, and crowd-pleasing. What’s not to love?
Ingredients for Baked Sweet and Sour Chicken
Okay friends, let’s gather our lineup – these simple ingredients come together to create something magical. I promise you probably have most of this in your pantry already! Here’s what you’ll need:
- 1 lb boneless, skinless chicken , cut into bite-sized pieces (trust me, uniform size means even cooking)
- 1 cup cornstarch (this is our crispy coating secret weapon!)
- 2 large eggs, beaten (the glue that holds our crispy coating together)
- 1/4 cup vegetable oil (just enough for that perfect golden brown sear)
- 1/2 cup granulated sugar (don’t worry – we’re balancing it with tang!)
- 1/4 cup ketchup (yes, really – it gives that classic sweet and sour color and flavor)
- 1/4 cup apple cider vinegar (my favorite for that bright tangy punch)
- 1 tbsp soy sauce (for that umami depth – use low sodium if you prefer)
- 1 tsp garlic powder (because everything’s better with garlic)
- 1/2 tsp salt (just enough to enhance all the flavors)
- 1/4 tsp black pepper (a little warmth never hurt anyone)
See? Nothing fancy or hard-to-find here. Now let’s get cooking!
Equipment You’ll Need
Before we dive in, let’s grab our kitchen tools – nothing fancy required! Here’s what you’ll want to have ready:
- A trusty 9×13 inch baking dish (glass or ceramic works great)
- Large skillet (for that initial golden-brown sear)
- Two mixing bowls (one for dry, one for wet ingredients)
- Measuring cups and spoons (precision matters with that sauce!)
- Whisk (for blending the sauce to silky perfection)
- Tongs or a fork (for flipping those chicken pieces)
- Rubber spatula (to scrape every last bit of sauce into the pan)
That’s it! No special gadgets needed – just basic kitchen essentials. Now roll up those sleeves – we’re about to make some magic!
How to Make Baked Sweet and Sour Chicken
Alright, let’s get cooking! This baked sweet and sour chicken comes together in just a few simple steps, but I’ll walk you through each one so you get perfect results every time. Don’t worry – it’s way easier than it looks!
Prepping the Chicken
First things first – let’s get that chicken ready for its crispy coating! Cut your chicken into bite-sized pieces (about 1-inch chunks work best). Now here’s the fun part: toss them in cornstarch until fully coated – it should look like little snowballs! Then dip each piece in beaten egg. The egg helps the coating stick and gives that gorgeous golden color when we brown it.
Making the Sweet and Sour Sauce
While your chicken’s getting its coating ready, let’s whip up that amazing sauce. Just whisk together the sugar, ketchup, vinegar, soy sauce, garlic powder, salt and pepper in a bowl. Taste it – you should get that perfect balance of sweet and tangy. Too sweet? Add a splash more vinegar. Too tart? A pinch more sugar. Trust your tastebuds!
Baking the Chicken
Now for the magic! After browning your chicken pieces in the skillet (just 2-3 minutes per side – we’re not cooking them through yet), transfer them to your baking dish. Pour that glorious sauce over top, making sure every piece gets coated. Bake at 325°F for 45 minutes, stirring every 15 minutes so the sauce coats evenly. You’ll know it’s done when the chicken reaches 165°F inside and the sauce is thick and sticky. Oh, that smell!
Tips for Perfect Baked Sweet and Sour Chicken
After making this recipe more times than I can count (and yes, burning a batch or two along the way), I’ve learned all the tricks for baked sweet and sour chicken perfection. Here’s what makes the difference between good and “oh-my-gosh-I-need-seconds” amazing:
Fresh is best: I know it’s tempting to use frozen chicken, but fresh give you that perfect tender bite without extra moisture messing with your coating.
Space those pieces out: When browning, don’t crowd the skillet! Give each piece room to breathe – otherwise they’ll steam instead of getting that gorgeous golden crust.
Sauce to taste: Dip a spoon in your sauce mix before pouring – want more tang? Add vinegar teaspoon by teaspoon. Prefer sweeter? A pinch more sugar does the trick.
Thermometer check: Even with timing, always verify your chicken hits 165°F internally. Undercooked chicken isn’t worth the risk!
Stir with care: When baking, gently fold the chicken rather than stirring vigorously – you want to keep that crispy coating intact.
Follow these simple tips, and you’ll have restaurant-quality baked sweet and sour chicken right from your own oven!
Serving Suggestions for Baked Sweet and Sour Chicken
Now comes the best part – plating up this gorgeous baked sweet and sour chicken! My absolute favorite way to serve it? Over a big fluffy mound of steamed jasmine rice – the sauce soaks right in and oh my goodness, it’s heaven. But don’t stop there! Here are my go-to pairings:
- Stir-fried veggies (bell peppers, broccoli, and snap peas add great crunch)
- Lo mein noodles for a takeout-at-home experience
- Simple cucumber salad to balance the richness
- Fried rice for those “clean out the fridge” nights
Pro tip: Sprinkle with sesame seeds and green onions right before serving – makes it look fancy with zero extra work!
Storing and Reheating Leftovers
Here’s the best part – this baked sweet and sour chicken tastes even better the next day! Store leftovers in an airtight container in the fridge for up to 3 days. When reheating, I always use the oven (about 350°F for 10-15 minutes) to keep that crispy texture. The microwave works in a pinch, but the coating gets a bit softer. Pro tip: Add a splash of water before reheating to keep the sauce from getting too thick!
Baked Sweet and Sour Chicken Recipe FAQs
I get asked about this baked sweet and sour chicken recipe ALL the time – so here are answers to the questions that pop up most often in my kitchen (and my DMs)!
Can I use chicken thighs instead of ?
Absolutely! Thighs work wonderfully and stay extra juicy. Just trim excess fat and keep pieces uniform in size. You might need an extra 5-10 minutes baking time since they’re thicker.
What can I substitute for cornstarch?
In a pinch, arrowroot powder or potato starch will work similarly. Flour can be used but won’t get quite as crispy. For gluten-free, tapioca starch is my go-to alternative. If you are interested in other ways to achieve crispiness without frying, check out this guide on air fryer chicken tenders.
Can I make this ahead of time?
You bet! Prep everything up to the baking step, then cover and refrigerate overnight. Add 5-10 minutes to the baking time since it’ll be cold. The sauce actually develops more flavor!
Why brown the chicken first if we’re baking it?
That quick skillet step creates flavor-packed caramelization you can’t get from baking alone. It’s the secret to that “fried” taste without the oil bath!
Can I freeze leftovers?
Yes! Freeze in single portions for up to 2 months. Thaw overnight in the fridge, then reheat in a 350°F oven until hot throughout (about 20 minutes). The sauce might be slightly thinner but still delicious.
Nutritional Information
Now, I’m no nutritionist, but I do believe in balance – and this baked sweet and sour chicken gives you the best of both worlds: incredible flavor without the guilt of deep-fried takeout! Keep in mind these numbers are estimates (your exact ingredients and portion sizes will vary).
A serving of this crispy, saucy goodness gives you plenty of protein from the chicken while keeping saturated fats lower than traditional fried versions. The sauce does contain sugar (it is “sweet and sour,” after all), but using fresh ingredients means you’re avoiding all those mystery additives in restaurant versions. For more information on general food safety and temperature guidelines, you can consult resources from the U.S. Food and Drug Administration.
Remember, nutritional values can change based on:
- The exact size of your chicken pieces
- How much sauce clings to each serving
- The specific brands of ingredients you use
- Any substitutions you make
My philosophy? Enjoy this delicious meal as part of a balanced diet – maybe pair it with extra veggies if you’re watching carbs, or serve smaller portions over cauliflower rice. Food should be joyful, not stressful!
Ready to taste the magic? Try this baked sweet and sour chicken recipe tonight and let me know how it turns out in the comments below – I love hearing your kitchen adventures!
Print
5-Ingredient Baked Sweet and Sour Chicken Recipe You’ll Love
- Total Time: 1 hour
- Yield: 4 servings 1x
- Diet: Low Lactose
Description
A simple baked sweet and sour chicken recipe with a crispy coating and tangy sauce.
Ingredients
- 1 lb boneless, skinless chicken , cut into bite-sized pieces
- 1 cup cornstarch
- 2 large eggs, beaten
- 1/4 cup vegetable oil
- 1/2 cup granulated sugar
- 1/4 cup ketchup
- 1/4 cup apple cider vinegar
- 1 tbsp soy sauce
- 1 tsp garlic powder
- 1/2 tsp salt
- 1/4 tsp black pepper
Instructions
- Preheat oven to 325°F (165°C).
- Coat chicken pieces in cornstarch, then dip in beaten eggs.
- Heat oil in a skillet over medium heat. Brown chicken for 2-3 minutes per side.
- Transfer chicken to a baking dish.
- Mix sugar, ketchup, vinegar, soy sauce, garlic powder, salt, and pepper in a bowl.
- Pour sauce over chicken.
- Bake for 45 minutes, stirring every 15 minutes.
- Serve hot.
Notes
- Use fresh chicken for best results.
- Adjust sugar and vinegar to taste.
- Serve with rice or vegetables.
- Prep Time: 15 minutes
- Cook Time: 45 minutes
- Category: Main Dish
- Method: Baking
- Cuisine: Asian
Nutrition
- Serving Size: 1 serving
- Calories: 380
- Sugar: 28g
- Sodium: 620mg
- Fat: 14g
- Saturated Fat: 2g
- Unsaturated Fat: 10g
- Trans Fat: 0g
- Carbohydrates: 45g
- Fiber: 1g
- Protein: 25g
- Cholesterol: 125mg
Keywords: baked sweet and sour chicken, easy chicken recipe, homemade sweet and sour chicken