
Okay, confession time – I used to be terrified of phyllo dough. Those delicate sheets seemed like they’d crumble if I even looked at them wrong! But then I discovered the magic of air fryer baklava cups, and suddenly this classic Mediterranean dessert became my go-to when I need something impressive FAST. Forget spending hours layering and baking a whole tray – these little crispy cups give you all that honey-kissed, nutty goodness in under 30 minutes.
My first attempt at traditional baklava ended in tears (literally – phyllo dough everywhere). But these air fryer baklava cups? Total game changer. The air fryer gives that perfect golden crunch without the fuss of a big oven bake. And the best part? You get those adorable individual portions that make you feel fancy without the work. I’ve made these for book club, potlucks, even just because it’s Tuesday – they’re that easy.
Trust me, once you try baklava this way, you’ll never go back to the old method. The air fryer works its magic on the phyllo layers, turning them into these crisp little vessels that hold all that spiced nut filling perfectly. And that honey syrup? It soaks in just right – not too soggy, not too dry. Just wait till you see how fast these disappear at your next gathering!
Why You’ll Love These Air Fryer Baklava Cups
Listen, I know what you’re thinking – “Baklava seems complicated!” But these little cups? They’re about to become your new obsession. Here’s why:
- Lightning fast: While traditional baklava takes hours, these air fryer beauties are done in under 30 minutes from start to finish. (Yes, really!)
- No mess, no stress: Forget scrubbing sticky baking sheets – the air fryer basket wipes clean in seconds. More time for eating!
- Portion perfection: Each crispy cup is just the right size – no more wrestling with a knife through layers of phyllo.
- That magical crunch: The air fryer gives you that golden, shatter-crisp texture we all crave, without any soggy bottoms.
Seriously, I made these last week when my in-laws surprised us with a visit. They thought I’d slaved all day – our little secret, right?
Ingredients for Air Fryer Baklava Cups
Gathering your ingredients for these baklava cups is almost as easy as eating them! Here’s what you’ll need to make magic happen in your air fryer:
- 6 sheets phyllo dough, thawed – I keep mine in the fridge overnight so it’s ready when I am
- 1/2 cup unsalted butter, melted – Go for the good stuff – it makes all the difference
- 1 cup finely chopped walnuts or pistachios – “Finely chopped” means about the size of rice grains (no big chunks!)
- 1/4 cup granulated sugar – Just enough to sweeten the nuts
- 1 tsp ground cinnamon – That warm spice that makes baklava sing
- 1/4 tsp ground cloves – A little goes a long way!
- 1/2 cup honey – The star of our syrup show
- 1 tbsp lemon juice – Fresh squeezed if you can (more on why this matters below)
- 1 tsp vanilla extract – The secret depth booster
Ingredient Substitutions & Notes
Don’t panic if you’re missing something – baklava is forgiving! Here are my tried-and-true swaps:
- Nut-free? Try toasted sunflower seeds or almond flour instead of walnuts
- Out of honey? Maple syrup or agave work in a pinch, though the flavor will be different
- Vegan? Use coconut oil instead of butter (just melt it gently)
- That lemon juice isn’t just for flavor – it keeps the honey syrup from crystallizing later. Science!
- Phyllo thawing tip: If you forgot to thaw overnight, leave the sealed package at room temp for 2 hours. No peeking!
Honestly? The first time I made these, I used half walnuts and half pecans because it’s what I had. They were still amazing. That’s the beauty of baklava – it wants to work with you!
How to Make Air Fryer Baklava Cups
Alright, let’s get to the fun part – making these crispy, honey-drenched beauties! Don’t let the steps intimidate you – I’ve broken everything down so even my 12-year-old nephew could follow along (and he did, with delicious results!). Here’s exactly how we’ll create baklava magic in that air fryer of yours.
Step 1: Prep Phyllo Dough
First rule of phyllo club: keep it covered! Lay a slightly damp kitchen towel over your dough sheets while you work – this is your insurance policy against the dreaded phyllo crackles. Use a sharp knife or pizza cutter to slice the sheets into 4×4 inch squares (about the size of a standard post-it note). I usually get 12 squares from 6 sheets, with some scraps for “quality testing” (wink).
Pro tip: If your squares aren’t perfect, don’t sweat it! My first batch looked like abstract art, and they still tasted incredible. Just aim for roughly equal sizes so they cook evenly.
Step 2: Assemble the Cups
Now for the buttery goodness! Brush each square lightly with melted butter – I use a silicone brush and work quickly before the butter cools. Stack three squares in each muffin tin cup, rotating them slightly so the corners overlap like flower petals. This creates those gorgeous layered edges.
Spoon about 1 tablespoon of your nut mixture into the center (don’t overfill – they’ll puff slightly). Gently press down with your fingers to create a little well, then fold the corners inward, lightly pressing to form a cup shape. No need to be perfect here – the rustic look is part of the charm!
Step 3: Air Fry & Add Syrup
Slide those beauties into your preheated air fryer (320°F is the sweet spot!). Set the timer for 8 minutes, then do the first check – you want golden edges with just a hint of darker brown. Mine usually need the full 10 minutes, but ovens vary, so keep an eye out after 8.
While they cook, make the syrup: simmer honey, lemon juice and vanilla for 2 minutes until slightly thickened. When your baklava cups come out all golden and crisp, immediately drizzle the warm syrup over them – you’ll hear the most satisfying sizzle as it soaks in! Let them sit for 10 glorious minutes before serving (this is when the magic happens as the syrup penetrates all those crispy layers).
Warning: Your kitchen will smell like a Turkish bakery, and you might find “helpers” appearing out of nowhere. Resist sneaking a bite too soon – that 10 minute wait makes all the difference!
Tips for Perfect Air Fryer Baklava Cups
After making these baklava cups more times than I can count (okay, fine – I lost count after batch #23), I’ve picked up some foolproof tricks to make sure yours turn out perfect every time. These are the little things that take them from “good” to “oh-my-goodness-can-I-have-the-recipe” level!
- Cold butter is your secret weapon: I know it sounds weird, but melting cold butter gives you that perfect thick-but-brushable consistency. Room temp butter tends to pool and make the phyllo soggy. Pop it in the microwave for just 15-second bursts – you want it melted but not hot.
- Resist the urge to overfill: That nut mixture smells so good, it’s tempting to pile it high! But trust me, 1 tablespoon max per cup is plenty. Any more and you’ll struggle to fold the edges, plus they might not crisp up properly. The nuts expand slightly as they toast in the air fryer.
- Patience with the syrup pays off: I used to dig in immediately (who wouldn’t?), but waiting that full 10 minutes lets the syrup work its magic. It soaks in just enough to soften the layers without making them mushy. Set a timer if you must – it’s worth it!
- Serve them warm for maximum wow: These are best within the first hour after making. That’s when the contrast between the crisp phyllo and gooey filling is absolute perfection. If you must store them, the air fryer reheats them beautifully – just 2 minutes at 300°F brings back that fresh-baked crunch.
Oh, and one bonus tip from my last kitchen disaster – if your syrup starts to crystallize later, just zap it for 10 seconds in the microwave with a teaspoon of water. Saved my baklava and my pride at last month’s book club!
Serving Suggestions for Air Fryer Baklava Cups
Now that you’ve made these gorgeous little baklava cups, let’s talk about how to serve them like a pro! I love playing around with different pairings – sometimes I go traditional, sometimes I get a little wild. Here are my favorite ways to make these crispy treats shine:
- Greek yogurt cloud: Spoon some thick Greek yogurt onto a plate and nestle a warm baklava cup on top. The cool creaminess against the honeyed crunch? Absolute heaven. My husband calls this “breakfast baklava” (shh, don’t tell anyone).
- Mint tea moment: There’s something magical about pairing these with steaming glasses of fresh mint tea. The herbal notes cut through the sweetness perfectly. I use my grandmother’s tiny glass teacups for extra charm.
- Ice cream sandwich surprise: Okay, hear me out – take two baklava cups and sandwich a scoop of vanilla ice cream between them. The warm-cold, crispy-creamy contrast will blow your mind. My kids beg for this version!
For garnishes, I keep a little bowl of crushed pistachios nearby for sprinkling – that pop of green makes them look so fancy! Orange zest is another favorite of mine; just a light grating over the top adds this bright citrus note that plays beautifully with the honey. Last time I had guests over, I did both garnishes in little stripes – looked like I’d hired a pastry chef!
Pro tip: If you’re serving these at a party, arrange them on a wooden board with small bowls of different toppings (think: edible rose petals, extra honey for drizzling, flaky sea salt for the adventurous). Let people customize their own – it’s such a fun interactive dessert!
Storage & Reheating
Okay, let’s talk about what to do with any baklava cups that miraculously survive past the first hour (it happens sometimes!). Here’s how to keep them tasting fresh and crispy – because nobody wants sad, soggy baklava.
Room temp storage: If you’re planning to eat them within 24 hours (let’s be real, you probably will), just pop them in an airtight container at room temp. I like to layer them between parchment paper so they don’t stick together. That honey syrup will keep them deliciously moist without turning the phyllo mushy.
Longer storage: For up to 2 days, stash them in the fridge in that same airtight container. But here’s the important part – don’t add the syrup until you’re ready to serve if you’re storing them this long. The fridge can make the phyllo lose its crispness, but we’ll fix that in a second.
Reheating magic: When you’re ready for round two, fire up that air fryer to 300°F. Give them just 2-3 minutes to bring back that perfect crunch. If you stored them without syrup, now’s the time to drizzle it on while they’re warm. Watch as the syrup gets all glossy and seeps into the layers – it’s like they’re fresh all over again!
Big no-no: Whatever you do, don’t microwave these beauties. I learned this the hard way – you’ll end up with rubbery phyllo and syrup that’s either lava-hot or weirdly crystallized. The air fryer is your best friend here, trust me.
One last tip: If you’re making these ahead for a party, I recommend assembling the cups but waiting to air fry them until an hour before serving. The unbaked cups keep beautifully in the fridge for a day, then you can pop them in the air fryer fresh – guaranteed showstoppers every time!
Air Fryer Baklava Cups Nutritional Info
Okay, let’s talk numbers – but remember, these baklava cups are meant to be enjoyed, not agonized over! Here’s the scoop on what’s in each delicious bite (based on my standard recipe with walnuts and honey):
- Calories: About 180 per cup (perfect little indulgence!)
- Sugar: 12g (mostly from that glorious honey)
- Fat: 12g (the good kind from nuts and butter)
- Protein: 3g (surprising protein punch from the walnuts)
- Fiber: 1g (every bit counts, right?)
Important note: These are estimates per cup based on standard ingredients. If you use different nuts or sweeteners, your numbers will change. My pistachio version, for example, comes in slightly higher in protein but lower in saturated fat. And if you’re watching sugar, you can always reduce the syrup drizzle (though I wouldn’t recommend skipping it entirely – that’s half the magic!).
Personally, I don’t stress too much about the numbers with these – they’re a treat, after all! I figure the joy they bring counts as positive nutrition too. But if you’re tracking for specific dietary needs, hopefully this gives you a good baseline. Now go enjoy that baklava guilt-free!
Frequently Asked Questions
I’ve gotten so many questions about these air fryer baklava cups since I started making them – here are the ones that pop up most often with my tried-and-true answers!
Can I use frozen phyllo dough?
Absolutely! Just thaw it overnight in the fridge (still in its packaging). The key is letting it thaw slowly – if you rush it on the counter, you might end up with sticky sheets that tear. Been there, done that, learned my lesson!
How do I prevent soggy baklava?
Two words: patience and temperature. Let your baked cups cool for 1-2 minutes before adding the syrup (I use this time to wipe down my butter-brushing station). And make sure your syrup isn’t boiling hot – just warm enough to be pourable. This little wait lets the phyllo set up so it stays crisp instead of turning mushy.
Can I make these ahead?
You can assemble the cups up to a day in advance (keep them covered in the fridge), but air fry them fresh for the best texture. The unbaked cups actually hold up great overnight! If you must store leftovers, keep them unfrosted and add the syrup when you reheat – they’ll still be delicious, just maybe not quite as perfect as fresh.
Got more questions? I love seeing your baklava cup creations – tag me on social media so I can ooh and ahh over them! #BaklavaCupMagic
Print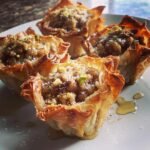
Effortless Air Fryer Baklava Cups in Just 30 Minutes
- Total Time: 25 mins
- Yield: 12 cups 1x
- Diet: Vegetarian
Description
Crispy, sweet baklava cups made easily in an air fryer. A quick and delicious dessert with layers of phyllo dough, nuts, and honey syrup.
Ingredients
- 6 sheets phyllo dough, thawed
- 1/2 cup unsalted butter, melted
- 1 cup finely chopped walnuts or pistachios
- 1/4 cup granulated sugar
- 1 tsp ground cinnamon
- 1/4 tsp ground cloves
- 1/2 cup honey
- 1 tbsp lemon juice
- 1 tsp vanilla extract
Instructions
- Preheat air fryer to 320°F (160°C).
- Cut phyllo sheets into 12 squares (about 4×4 inches).
- Brush each square with melted butter and layer 3 squares in a muffin tin, overlapping slightly.
- Mix nuts, sugar, cinnamon, and cloves. Spoon 1 tbsp mixture into each phyllo cup.
- Press down lightly and fold edges inward to form cups.
- Air fry for 8-10 minutes until golden and crisp.
- Heat honey, lemon juice, and vanilla in a small saucepan. Simmer for 2 minutes.
- Drizzle warm syrup over baklava cups. Let sit 10 minutes before serving.
Notes
- Keep phyllo dough covered with a damp towel to prevent drying.
- Adjust nuts to your preference (walnuts, pistachios, or a mix).
- Serve warm for the best texture.
- Prep Time: 15 mins
- Cook Time: 10 mins
- Category: Dessert
- Method: Air Fryer
- Cuisine: Mediterranean
Nutrition
- Serving Size: 1 cup
- Calories: 180
- Sugar: 12g
- Sodium: 80mg
- Fat: 12g
- Saturated Fat: 4g
- Unsaturated Fat: 7g
- Trans Fat: 0g
- Carbohydrates: 18g
- Fiber: 1g
- Protein: 3g
- Cholesterol: 15mg
Keywords: air fryer baklava, baklava cups, quick baklava, phyllo dessert