
You know those days when you’re running from one thing to the next, stomach growling, and the vending machine starts looking way too tempting? That’s exactly why I became obsessed with whipping up these Air Fryer High Protein Snacks! I’m talking crispy, savory, protein-packed bites that come together in minutes – perfect for when you need a quick energy boost without the crash. My kids call them “mom’s magic beans” because they disappear faster than I can make them!
I started making these when my oldest began track practice and needed something substantial but easy to digest before meets. Now they’re my go-to for afternoon slumps, post-workout fuel, or even movie nights when we want something crunchy without the guilt. The air fryer works its magic, turning humble chickpeas into little flavor bombs that keep you full and satisfied. Trust me, once you try these, you’ll wonder how you ever snacked without them!
Why You’ll Love These Air Fryer High Protein Snacks
Let me count the ways these little crispy wonders will become your new snack obsession:
- Lightning fast – From craving to crunching in under 20 minutes (perfect when hunger strikes NOW)
- Crave-worthy crunch – That addictive air-fried texture that makes chips jealous
- Protein powerhouse – 12g per serving to keep you full and focused
- Totally customizable – Swap spices to match your mood (I’m addicted to adding smoked paprika!)
- No guilt needed – All the satisfaction of junk food with actual nutrition
Seriously, these check every box – even my picky toddler approves!
The Simple Ingredients That Make Magic Happen
What I love most about these protein-packed snacks? You probably have most of this stuff in your pantry already! Here’s exactly what you’ll need – and yes, those little prep details matter more than you’d think:
- 1 cup cooked chickpeas – Drained and thoroughly patted dry (trust me, wet chickpeas = sad soggy snacks)
- 2 tbsp olive oil – The good stuff! This helps everything get perfectly crispy
- 1/2 tsp salt – I use kosher salt for better flavor distribution
- 1/4 tsp paprika – Smoked paprika is my secret weapon for extra depth
- 1/4 tsp garlic powder – Not garlic salt! We want pure garlicky goodness
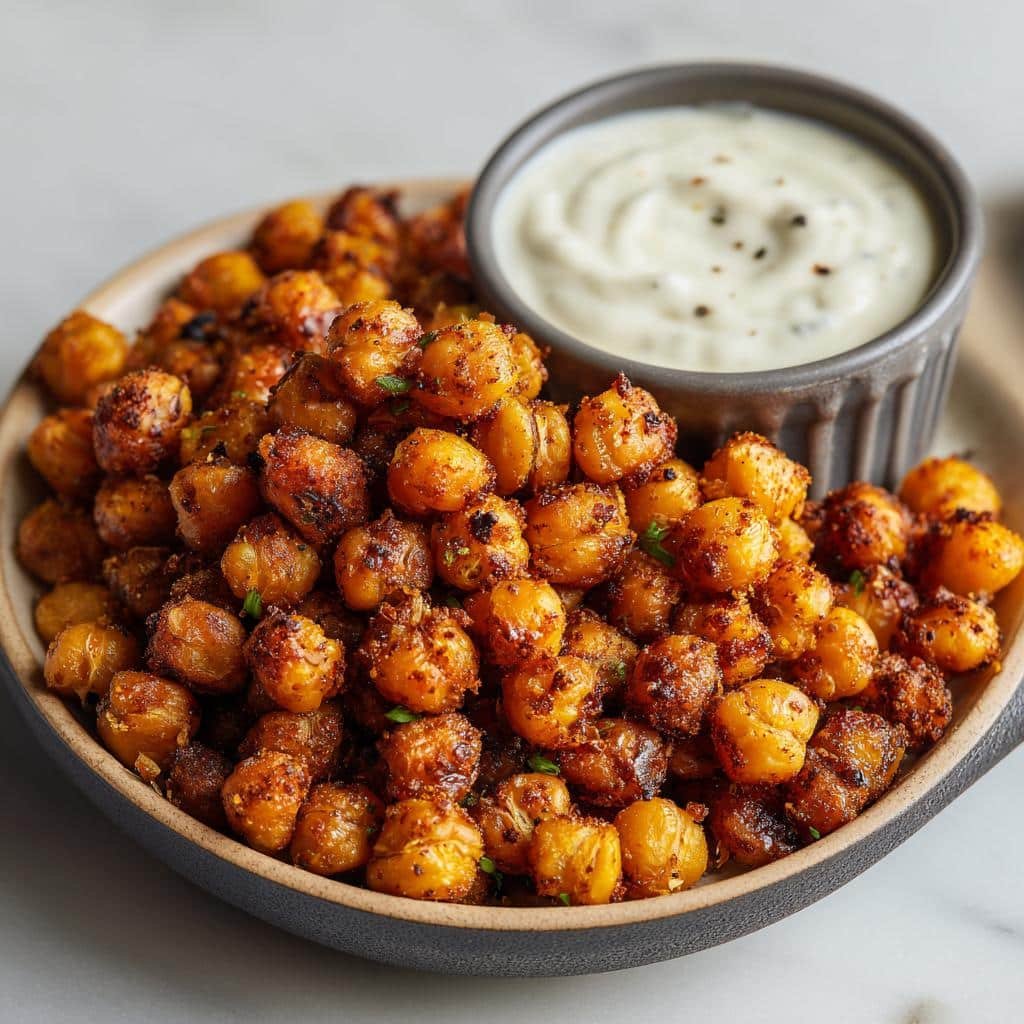
- 1/2 cup Greek yogurt – Full fat for creaminess, but any % works
- 1/4 cup shredded cheese – Sharp cheddar is my go-to, but any melty cheese shines
That’s it! Seven simple ingredients that transform into something way greater than the sum of their parts. The beauty? You can scale this up or down depending on how many hungry mouths you’re feeding. I often double (okay, triple) the batch because these disappear fast in my house!
Equipment You’ll Need
Okay, let’s talk tools! The beauty of this recipe is that you don’t need any fancy gadgets—just a few basics that you probably already have in your kitchen. Here’s what you’ll need to make these crispy little protein bites:
- An air fryer – Obviously! Any size works, but I find a 4-6 quart model gives the chickpeas enough room to crisp up evenly.
- A mixing bowl – Nothing fancy, just something big enough to toss those chickpeas with all the delicious seasonings.
- Measuring spoons – Because eyeballing spices never works out quite right (learned that the hard way!).
- A kitchen towel or paper towels – For drying those chickpeas like your snack’s crunch depends on it (because it does!).
- A spatula or spoon – For mixing everything together without making a mess (though I can’t promise you won’t get a little oil on your hands—it’s part of the fun!).
That’s seriously it! No special equipment, no single-use tools cluttering your drawers. Just simple, everyday kitchen essentials that’ll help you whip up the perfect snack in no time.
How to Make Air Fryer High Protein Snacks
Okay, let’s get to the fun part – turning these simple ingredients into crispy, protein-packed magic! I’ll walk you through each step so you get perfect results every time. Don’t worry – it’s so easy you’ll have it memorized after the first batch!
Step 1: Season the Chickpeas
First things first – grab that bowl of dried chickpeas (remember, dry is key here!). Drizzle in your olive oil and toss until every single chickpea gets a glossy coat. Now the fun part – sprinkle in your salt, paprika, and garlic powder. I like to use my fingers to really massage those spices in – you’ll see them clinging to the oil in the most beautiful way. The goal? Every chickpea should look like it’s dressed for a flavor party!
Step 2: Air Fry to Crispy Perfection
While you’re seasoning those chickpeas, let your air fryer preheat to 375°F (190°C) – about 3 minutes usually does it. When it’s ready, pour in your seasoned chickpeas in a single layer – no piling! They need their personal space to crisp up properly. Set your timer for 10-12 minutes, but here’s the secret: at the 5-minute mark, give that basket a good shake! This helps them cook evenly and prevents any burnt spots. You’ll know they’re done when they’re golden and make a delightful “tink” sound when you toss them.
Step 3: Prepare the Yogurt Dip
While your chickpeas are getting crispy, let’s make the perfect dipping companion! Simply mix your Greek yogurt and shredded cheese in a small bowl – I like to do this while the air fryer’s running so everything’s ready at the same time. The cheese will melt slightly from the yogurt’s coolness, creating this amazing creamy texture. If you’re feeling fancy, sprinkle a pinch of the same spices you used on the chickpeas right into the dip for extra flavor harmony!
And that’s it! Three simple steps to snack heaven. The hardest part now? Waiting those 30 seconds for the chickpeas to cool enough to eat without burning your tongue (though I never manage to wait that long!).
Tips for Perfect Air Fryer High Protein Snacks
After making these crispy chickpeas more times than I can count (seriously, my air fryer deserves a medal), I’ve picked up some game-changing tricks that’ll take your snacks from good to “oh-my-goodness-gimme-more” amazing:
Dry, dry, and dry some more!
I know I’ve said it before, but it’s worth repeating – pat those chickpeas until they’re desert-level dry! Any moisture left on them will steam instead of crisp up in the air fryer. My trick? Spread them on a clean kitchen towel after rinsing and roll them around like you’re putting toddlers to bed. Then go over them with paper towels just to be extra sure.
Shake it like you mean it
Don’t just give the basket a timid wiggle halfway through – really shake those chickpeas with enthusiasm! I open the basket and give it a few good shakes (holding the tray steady, of course) to make sure every surface gets equal crisp-time. Bonus: it’s oddly satisfying and makes you feel like a professional chef!
Size matters (with your air fryer basket)
If your chickpeas are coming out unevenly cooked, check how full your basket is. They should be in a single layer with a little breathing room – if they’re piled on top of each other, they’ll steam instead of crisp. When I’m making a big batch, I’d rather do two rounds than sacrifice that perfect crunch!
Let them rest before digging in
I know it’s tempting to eat them straight from the basket (believe me, I’ve burned my fingers more times than I’d like to admit), but letting them sit for 2-3 minutes after cooking helps them crisp up even more. The residual heat works its magic, giving you that perfect satisfying crunch in every bite.
Variations for Air Fryer High Protein Snacks
The beauty of these protein snacks? You can mix them up a million ways to match whatever you’re craving! Here are my favorite twists that keep things exciting:
- Bean swap – Black beans work amazingly well (just pat them extra dry first!)
- Spice it up – A pinch of cayenne or chili powder adds the perfect kick
- Sweet & salty – Try cinnamon and a drizzle of honey for a dessert-like treat
- Everything bagel – Toss with everything seasoning for instant brunch vibes
- Taco night – Use taco seasoning mix and serve with salsa instead of yogurt
See? Endless possibilities from one simple base recipe!
Serving and Storing Air Fryer High Protein Snacks
Oh, the joy of that first crispy bite! I always serve these straight from the air fryer when they’re at their absolute peak of crunchiness – just be careful, they’re tiny little flavor bombs that retain heat like nobody’s business. My family gathers around like it’s popcorn at a movie, grabbing handfuls straight from the serving bowl. The yogurt dip? Absolutely essential for that perfect creamy-crunchy contrast. I like to sprinkle a little extra paprika on top for a pop of color – makes it feel extra fancy!
Keeping the crunch (because leftovers shouldn’t be sad)
Now let’s talk storage, because I know you’ll want to make extra (smart move!). Once completely cooled – and I mean completely, no lingering warmth at all – transfer your crispy chickpeas to an airtight container. I’m partial to glass jars because they keep everything fresh and let me admire my handiwork. Stored properly, they’ll stay crunchy for up to 3 days at room temperature. The yogurt dip? That goes in a separate container in the fridge – it’ll last about 4-5 days.
Bringing back the magic (how to revive leftovers)
If your chickpeas lose their crisp after day two (it happens!), don’t despair! Just pop them back in the air fryer at 375°F for 2-3 minutes to wake them right up. No preheating needed – the quick blast of hot air works like a charm. The dip might thicken in the fridge, so I stir in a teaspoon of milk to bring it back to dipping consistency. Pro tip: If you’re packing these for lunch, keep the dip and chickpeas separate until you’re ready to eat – nobody likes a soggy snack!
One last serving suggestion from my snack-obsessed heart: try crumbling these over salads or soups instead of croutons! The crunch holds up surprisingly well, and it’s such an easy way to add protein to any meal. My kids love when I sprinkle them over creamy tomato soup – makes them feel like they’re getting away with eating “chips” for lunch!
Nutritional Information
Let’s talk about what makes these snacks such a win for your body! Here’s the breakdown per serving (about 1/2 cup of those crispy chickpeas with a dollop of yogurt dip):
- Calories: 220 (perfect for that afternoon pick-me-up)
- Protein: 12g (hello, muscle fuel!)
- Carbs: 20g (with 5g fiber to keep you satisfied)
- Fat: 10g (the good kind from olive oil and cheese)
- Sugar: Just 3g (no blood sugar spikes here)
Now, here’s my nutritionist friend’s favorite part – these little guys pack a serious nutrient punch too! Chickpeas give you iron, folate, and magnesium, while the Greek yogurt adds calcium and probiotics. The olive oil? That’s your heart-healthy fats right there. Healthy fats are crucial for overall wellness.
Important note: Nutrition varies based on ingredients/brands. Values are estimates. If you’re watching specific macros or have dietary needs, definitely tweak the recipe to fit – maybe use low-fat yogurt or adjust the oil amount. But in my book, this is the perfect balance of tasty and nourishing!
Frequently Asked Questions
Can I use canned chickpeas instead of cooked ones?
Absolutely! Canned chickpeas are actually what I use most often – they’re such a time-saver. Just make sure to drain them really well and give them that thorough pat-dry treatment I keep harping on about. Pro tip: Look for low-sodium versions so you can control the salt level yourself!
Why are my chickpeas coming out soggy instead of crispy?
Oh honey, I’ve been there! Usually it’s one of three things: 1) Not drying them enough before seasoning (seriously, go nuts with those paper towels), 2) Overcrowding the air fryer basket (they need their personal space to crisp up properly), or 3) Not shaking the basket halfway through cooking. Fix these and you’ll get that perfect crunch every time!
Can I make these without an air fryer?
You sure can! Just spread your seasoned chickpeas on a baking sheet and pop them in a 400°F (200°C) oven for about 20-25 minutes, shaking halfway. They won’t get quite as evenly crispy as in the air fryer, but they’ll still be delicious. The air fryer just gives them that magical all-over crunch!
How can I make these spicier?
Now you’re speaking my language! I love adding 1/4 teaspoon of cayenne pepper to the spice mix, or sometimes a dash of hot sauce right into the yogurt dip. My husband’s favorite version uses chili lime seasoning – it gives that addictive sweet-heat combo that makes you keep reaching for more!
Are these snacks good for meal prep?
They’re one of my favorite meal prep staples! I make a big batch on Sundays and store the chickpeas separately from the dip. They’ll stay crispy for about 3 days in an airtight container – just give them a quick 2-minute air fryer refresh before eating if needed. Perfect for tossing into lunchboxes or grabbing when the snack attacks hit!
Share Your Results
I can’t tell you how much it makes my day when I hear about your crispy chickpea adventures! Did yours come out extra crunchy? Maybe you discovered an amazing new spice combo? I want to hear all about it – the triumphs, the hilarious fails (we’ve all been there!), and especially those “oh wow” moments when you took your first perfect bite.
My favorite part of sharing recipes is seeing how everyone makes them their own. Maybe you added an unexpected twist that became a new family favorite, or perhaps you found the perfect timing for your specific air fryer model. Whatever your experience, drop me a note – I read every single one while nibbling on my latest batch (currently testing a ranch-seasoned version that’s dangerously addictive!).
And if you snapped a photo of your golden crispy creations? Even better! There’s something so satisfying about seeing rows of perfectly air-fried chickpeas ready to be devoured. Whether yours turned out textbook-perfect or wonderfully imperfect, I’d love to celebrate your snack-making wins with you!
Print
Crispy Air Fryer High Protein Snacks You’ll Crave Daily
- Total Time: 17 minutes
- Yield: 2 servings 1x
- Diet: Low Fat
Description
Make quick and healthy high-protein snacks using your air fryer. These easy recipes help you stay fueled and satisfied.
Ingredients
- 1 cup cooked chickpeas
- 2 tbsp olive oil
- 1/2 tsp salt
- 1/4 tsp paprika
- 1/4 tsp garlic powder
- 1/2 cup Greek yogurt
- 1/4 cup shredded cheese
Instructions
- Preheat air fryer to 375°F (190°C).
- Toss chickpeas with olive oil, salt, paprika, and garlic powder.
- Spread chickpeas in the air fryer basket in a single layer.
- Cook for 10-12 minutes, shaking halfway.
- Mix Greek yogurt and shredded cheese in a bowl.
- Serve crispy chickpeas with yogurt dip.
Notes
- Store leftovers in an airtight container for up to 3 days.
- Adjust seasonings to your taste.
- For extra crunch, cook chickpeas for 2-3 more minutes.
- Prep Time: 5 minutes
- Cook Time: 12 minutes
- Category: Snack
- Method: Air Fryer
- Cuisine: International
Nutrition
- Serving Size: 1/2 cup
- Calories: 220
- Sugar: 3g
- Sodium: 300mg
- Fat: 10g
- Saturated Fat: 2g
- Unsaturated Fat: 6g
- Trans Fat: 0g
- Carbohydrates: 20g
- Fiber: 5g
- Protein: 12g
- Cholesterol: 5mg
Keywords: air fryer, high protein, healthy snack, quick recipe