
You know those last-minute “I need an appetizer NOW” panic moments? That’s exactly how my creamy bacon ranch roll ups recipe became my go-to party lifesaver. I first threw these together when my neighbors unexpectedly dropped by for game night – and wow, did they disappear fast! The combo of crispy bacon, tangy ranch, and that irresistible cream cheese spread wrapped up in a soft tortilla? Pure magic.
What I love most is how these roll ups feel fancy but take barely any effort. Seriously, you probably have most ingredients in your fridge right now. They’re the perfect blend of creamy, crunchy, and fresh that makes people keep reaching for “just one more.” Every time I bring these to gatherings, someone inevitably asks for the recipe – and now it’s your turn to be the appetizer hero!
Why You’ll Love This Creamy Bacon Ranch Roll Ups Recipe
Trust me, these little roll ups are about to become your new best friend. Here’s why:
- Quick & easy – 15 minutes of prep and no cooking? Yes please!
- Crowd-pleasing flavors – Bacon + ranch + cream cheese = instant hit
- Perfect for any occasion – Game day, potlucks, even fancy cocktail parties
- Make-ahead magic – They actually taste better after chilling
- Endlessly customizable – Swap veggies or add heat with jalapeños
The best part? They disappear faster than you can say “pass me another one!”
Ingredients for Creamy Bacon Ranch Roll Ups
Here’s everything you’ll need to make these irresistible roll ups – and yes, every single ingredient matters! I’ve learned through many batches that quality makes all the difference here.
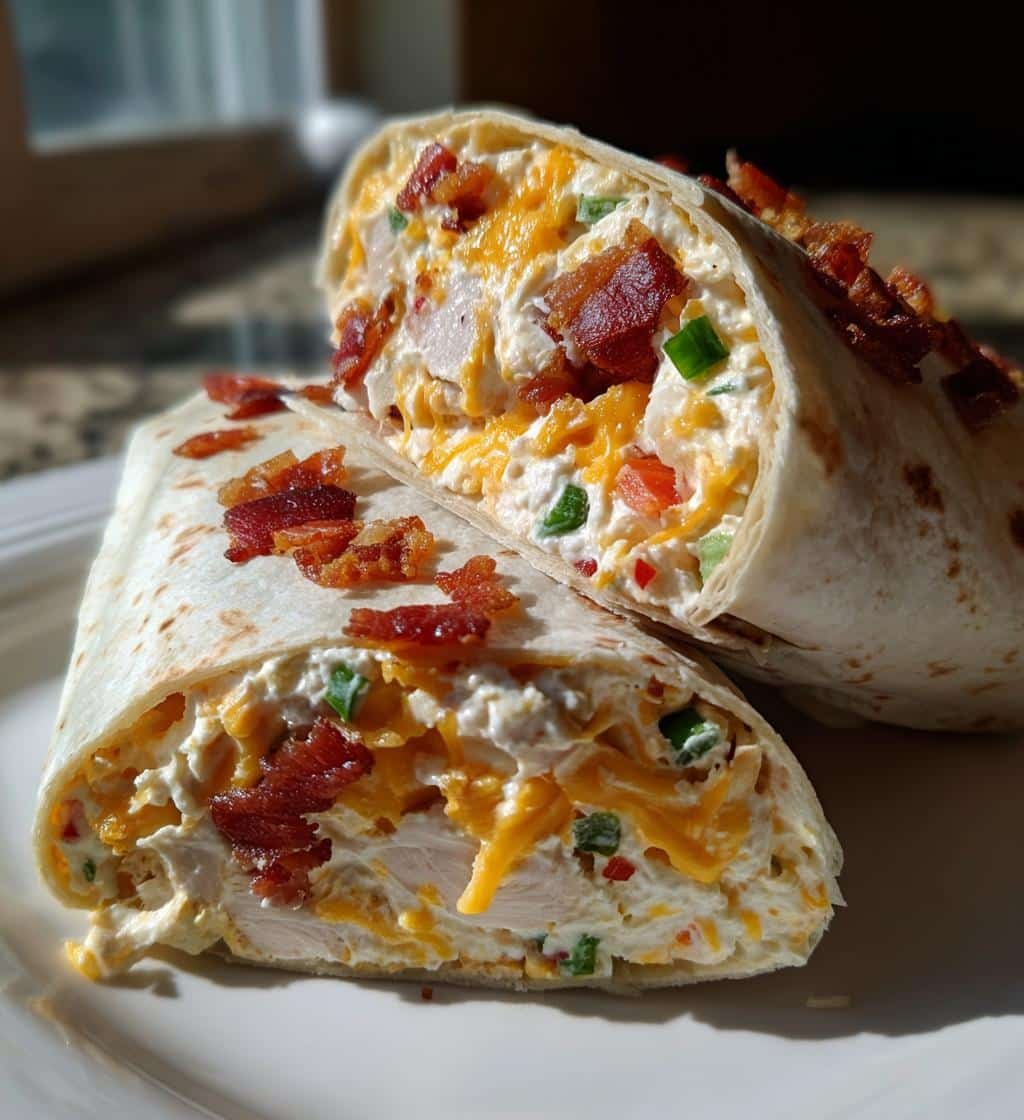
- 8 large flour tortillas (about 10-inch size – the bigger ones roll easier)
- 8 oz cream cheese, softened to room temperature (trust me, cold cream cheese won’t spread right)
- 1/2 cup ranch dressing (use the good stuff – homemade or your favorite brand)
- 1 cup shredded cheddar cheese (I prefer sharp cheddar for that extra tang)
- 6 slices bacon, cooked until crispy and crumbled (save the grease for other recipes!)
- 1/2 cup chopped green onions (both white and green parts for maximum flavor)
- 1/2 cup diced bell peppers (any color works, but I love the crunch of red ones)
Pro tip: Set your cream cheese out about 30 minutes before starting – it’ll make your life so much easier when mixing!
Equipment You’ll Need
Don’t worry – you won’t need any fancy gadgets for these roll ups! Just grab these basic kitchen essentials:
- A medium mixing bowl (I use my trusty ceramic one – plastic works too)
- A sturdy spatula or spoon for blending that creamy filling
- A sharp knife (for chopping veggies and slicing the rolls later)
- Cutting board (my colorful one makes prep more fun)
- Plastic wrap (the unsung hero for keeping rolls tight while chilling)
That’s it! No special tools required – just good old-fashioned kitchen basics. Now let’s get rolling!
How to Make Creamy Bacon Ranch Roll Ups
Okay, let’s get to the fun part – making these irresistible roll ups! I promise it’s easier than you think, and I’ll walk you through each step just like I would if we were cooking together in my kitchen.
Step 1: Mix the Creamy Ranch Filling
First, grab that softened cream cheese – it should dent easily when you press it. Toss it into your mixing bowl with the ranch dressing and shredded cheddar. Now, here’s my secret: mix slowly at first to prevent splatters, then really go for it until everything is perfectly smooth. You want a spreadable consistency like thick frosting – no lumps allowed! If it seems too stiff, add just a teaspoon more ranch (but don’t overdo it).
Step 2: Assemble the Roll Ups
Lay out your tortillas on a clean surface. Spread about 2 tablespoons of the creamy mixture evenly over each one, going right to the edges (but not too thick or it’ll squish out). Sprinkle bacon, green onions, and bell peppers evenly across each tortilla – I like to press them lightly into the cream cheese so they stick. Now roll them up TIGHTLY like a sleeping bag – the tighter, the better they’ll hold together when slicing.
Step 3: Chill and Slice
Here’s where patience pays off! Wrap each roll tightly in plastic wrap (this is crucial) and refrigerate for at least 1 hour – I often do 2 hours for perfect firmness. When ready to serve, unwrap and slice into 1-inch pieces with a sharp knife (wipe it clean between cuts for neat edges). Arrange them on a platter and watch them disappear!
Tips for Perfect Creamy Bacon Ranch Roll Ups
After making these roll ups more times than I can count (seriously, my friends request them constantly), I’ve picked up some game-changing tricks that’ll take yours from good to “can I have the recipe?” amazing.
Temperature is everything
That cream cheese must be properly softened – I leave mine out for a full hour if my kitchen’s cool. Cold cream cheese equals lumpy frustration and torn tortillas. Test it by pressing with a clean finger – it should dent easily without being melty.
The rolling technique matters
Here’s how I get those perfect tight rolls every time: start by folding over about an inch of tortilla edge before rolling. This creates a tight “core” that keeps everything compact. Roll away from yourself while gently pulling back on the filling – sounds fancy, but you’ll get the hang of it fast!
Variations to try
- Spicy kick: Add 1-2 diced jalapeños (seeds removed if you’re sensitive) or a dash of hot sauce to the cream cheese mix
- Smoky twist: Swap regular bacon for applewood-smoked or add a pinch of smoked paprika
- Veggie-loaded: Throw in some shredded carrots or thinly sliced cucumbers for extra crunch
- Different cheeses: Pepper jack gives a nice zing, or try crumbled blue cheese for bold flavor
One last pro tip: if you’re making these ahead (smart move!), wait to slice them until just before serving. The exposed edges can dry out slightly in the fridge. Keep the whole rolls wrapped tight until showtime!
Serving Suggestions for Creamy Bacon Ranch Roll Ups
Now for my favorite part – making these roll ups look as amazing as they taste! Presentation is everything when you want that “wow” factor at parties. Here’s how I love to serve them:
The Perfect Party Platter
I always arrange my sliced roll ups in a circular pattern on a large white platter – the contrast makes the colors pop! Leave a small gap between each piece so guests can grab them easily. For extra flair, tuck some fresh parsley or cilantro sprigs around the edges. If I’m feeling fancy, I’ll sprinkle a little extra crumbled bacon and diced peppers over the top right before serving.
Dipping Sauce Duos
While these roll ups are delicious on their own, offering dipping sauces takes them to another level. My go-to pairings are:
- Extra ranch dressing (because you can never have too much ranch!)
- Spicy mayo – just mix mayo with a bit of sriracha
- Avocado crema – blend avocado with sour cream and lime juice
Place small bowls of sauces in the center of your platter – it creates such a pretty, inviting display!
Veggie Sidekicks
Balance out the richness with some fresh crudités arranged around the roll ups. My favorites are:
- Crisp celery sticks
- Cherry tomatoes on small skewers
- Cucumber rounds
- Baby carrots
The colors make your whole spread look vibrant, and guests love having lighter options alongside the indulgent roll ups. Pro tip: If you’re serving these at a cocktail party, stick toothpicks in every other roll up piece – makes them super easy to grab while mingling!
Remember, the key is to keep it simple but thoughtful. Even just arranging them neatly on a nice plate with a little garnish makes all the difference. Your guests will think you spent hours in the kitchen – let’s keep that our little secret! You can find more great appetizer ideas on my Pinterest page.
Storage and Reheating
Here’s the beautiful thing about these roll ups – they actually get better after some fridge time! I always make extra because they keep so well. Just pop them in an airtight container (I love my glass ones with the snap lids) and they’ll stay fresh for up to 3 days. The plastic wrap is your friend here – keep those rolls tightly wrapped until you’re ready to slice and serve.
Now, about reheating – don’t! These creamy bacon ranch roll ups are meant to be enjoyed cold. Warming them up would make the tortillas soggy and the filling too soft. Trust me, the flavors meld together perfectly when chilled. If you’ve got leftovers (which rarely happens in my house!), just grab a slice straight from the fridge for a delicious snack.
One quick warning: if you’ve added fresh veggies like cucumbers or tomatoes, eat them within a day as those can make the tortillas watery over time. Otherwise, these little flavor bombs hold up amazingly well in the fridge – if they last that long!
Nutritional Information
Okay, let’s talk numbers – but remember, these creamy bacon ranch roll ups are meant to be enjoyed, not stressed over! Here’s the approximate nutritional breakdown per roll up (based on slicing into 24 pieces):
- Calories: 120
- Fat: 8g (3g saturated)
- Carbs: 8g
- Protein: 4g
- Sodium: 210mg
- Sugar: 1g
Now, here’s my kitchen confession – these numbers can swing quite a bit depending on your exact ingredients. Used thick-cut bacon? That’ll add more fat. Opted for low-carb tortillas? Carbs go down. That’s why I always say nutritional values are estimates and vary based on ingredients used.
The good news? Each roll up packs enough flavor that most people find one or two totally satisfying. And with that protein from the bacon and cheese, they’re more substantial than your typical appetizer. Just another reason I love serving these at gatherings – they keep hunger at bay while tasting absolutely indulgent!
Frequently Asked Questions
Can I use turkey bacon instead of regular bacon?
Absolutely! Turkey bacon works just fine if you’re looking for a lighter option. Just make sure to cook it extra crispy so it crumbles well – soggy turkey bacon won’t give you that satisfying crunch. My sister swears by applewood-smoked turkey bacon in her version, and honestly? You can barely tell the difference!
How far ahead can I make these roll ups?
Here’s the beautiful part – these actually taste better when made ahead! I often prepare them the night before (up to 24 hours in advance) and just slice them right before serving. The flavors have more time to meld together in the fridge. Just keep them tightly wrapped in plastic wrap until showtime to prevent drying.
My tortillas keep tearing – what am I doing wrong?
Oh honey, I’ve been there! Usually this means either your cream cheese mixture is too stiff (did you forget to soften it?) or you’re spreading it too thick. Try warming your tortillas for 10 seconds in the microwave first – makes them more pliable. And remember: gentle hands when rolling! No need to squeeze the life out of them.
Can I freeze these roll ups?
Technically yes, but I don’t recommend it. The texture changes after freezing – tortillas get soggy when thawed, and the veggies lose their crispness. If you must freeze, wrap each whole roll tightly in plastic wrap then foil, and use within 2 weeks. Thaw overnight in the fridge before slicing. But honestly? They’re so quick to make fresh, it’s worth the extra 15 minutes!
What’s the best way to transport these to a party?
After many messy learning experiences, here’s my foolproof method: keep them whole until arrival! Wrap each roll tightly in plastic wrap, then pack them upright in a container with a tight lid. Bring your sharp knife and a cutting board separately. Slice them at your destination – this keeps the edges fresh and prevents squishing. Bonus: they make your kitchen smell amazing while you’re prepping!
Share Your Feedback
You know what makes me happiest? Hearing how these creamy bacon ranch roll ups turned out in your kitchen! Did your family go crazy for them like mine does? Maybe you put your own spin on the recipe – I’d love to hear about it! Drop me a note in the comments about your experience (or any brilliant variations you came up with).
Every time someone tells me they served these at a party and watched them disappear, it brings back memories of my first batch. Cooking is all about sharing the love, and your stories keep that tradition alive. Did the kids gobble them up? Did your picky eater finally try something new? Those little victories make my day!
And hey – if you ran into any snags along the way, don’t hesitate to ask. We’ve all been there (remember my torn tortilla disaster of 2018?), and sometimes a quick tip makes all the difference. Your feedback helps me make these recipes even better for everyone!
Print
Our 15-Minute Creamy Bacon Ranch Roll Ups Recipe Secret
- Total Time: 1 hour 15 mins
- Yield: 24 roll ups 1x
- Diet: Low Lactose
Description
Creamy bacon ranch roll ups are a delicious and easy-to-make appetizer perfect for parties or snacks. They combine crispy bacon, creamy ranch, and fresh vegetables rolled in tortillas for a tasty bite.
Ingredients
- 8 large flour tortillas
- 8 oz cream cheese, softened
- 1/2 cup ranch dressing
- 1 cup shredded cheddar cheese
- 6 slices bacon, cooked and crumbled
- 1/2 cup chopped green onions
- 1/2 cup diced bell peppers
Instructions
- In a bowl, mix cream cheese, ranch dressing, and shredded cheddar cheese until smooth.
- Spread the mixture evenly over each tortilla.
- Sprinkle bacon, green onions, and bell peppers evenly over the cream cheese layer.
- Roll each tortilla tightly and wrap in plastic wrap.
- Refrigerate for at least 1 hour before slicing into 1-inch pieces.
- Serve chilled.
Notes
- For a spicier version, add jalapeños or hot sauce.
- Use whole wheat tortillas for a healthier option.
- These can be made a day ahead for convenience.
- Prep Time: 15 mins
- Cook Time: 0 mins
- Category: Appetizer
- Method: No-Cook
- Cuisine: American
Nutrition
- Serving Size: 1 roll up
- Calories: 120
- Sugar: 1g
- Sodium: 210mg
- Fat: 8g
- Saturated Fat: 3g
- Unsaturated Fat: 4g
- Trans Fat: 0g
- Carbohydrates: 8g
- Fiber: 0.5g
- Protein: 4g
- Cholesterol: 15mg
Keywords: bacon ranch roll ups, creamy appetizer, easy party snacks