
Oh my goodness, if you haven’t tried pickled shrimp yet, you are missing out on one of life’s little tangy joys! I first fell in love with this Southern gem at a backyard fish fry – one bite of those briny, citrusy shrimp on a buttery er and I was hooked. Now I make pickled shrimp five irresistible ways, from lazy appetizers to fancy salad toppers. The best part? It’s ridiculously easy to whip up, and that bright, punchy flavor just gets better as it chills. Trust me, once you try this, you’ll be finding excuses to put pickled shrimp on everything!
Ingredients for Pickled Shrimp 5 Irresistible Ways to Enjoy
Here’s everything you’ll need to make these zesty little bites of heaven. I’m a stickler for fresh ingredients – trust me, it makes all the difference with pickled shrimp. And don’t worry, I’ve tested these quantities a dozen times to get that perfect tangy-sweet balance just right.
- 1 lb large shrimp – peeled, deveined (tails on or off, your choice!)
- 1 cup white vinegar – the backbone of our brine
- 1/2 cup water – to mellow out the vinegar’s punch
- 1/4 cup sugar – creates that irresistible sweet-tangy combo
- 1 tbsp salt – I use kosher for even distribution
- 1 tsp black peppercorns – whole, for subtle heat
- 1 tsp mustard seeds – little pops of earthy flavor
- 1 bay leaf – that aromatic secret weapon
- 1 lemon – thinly sliced (seeds removed, please!)
- 1 small onion – paper-thin slices (I use mandoline for perfect evenness)
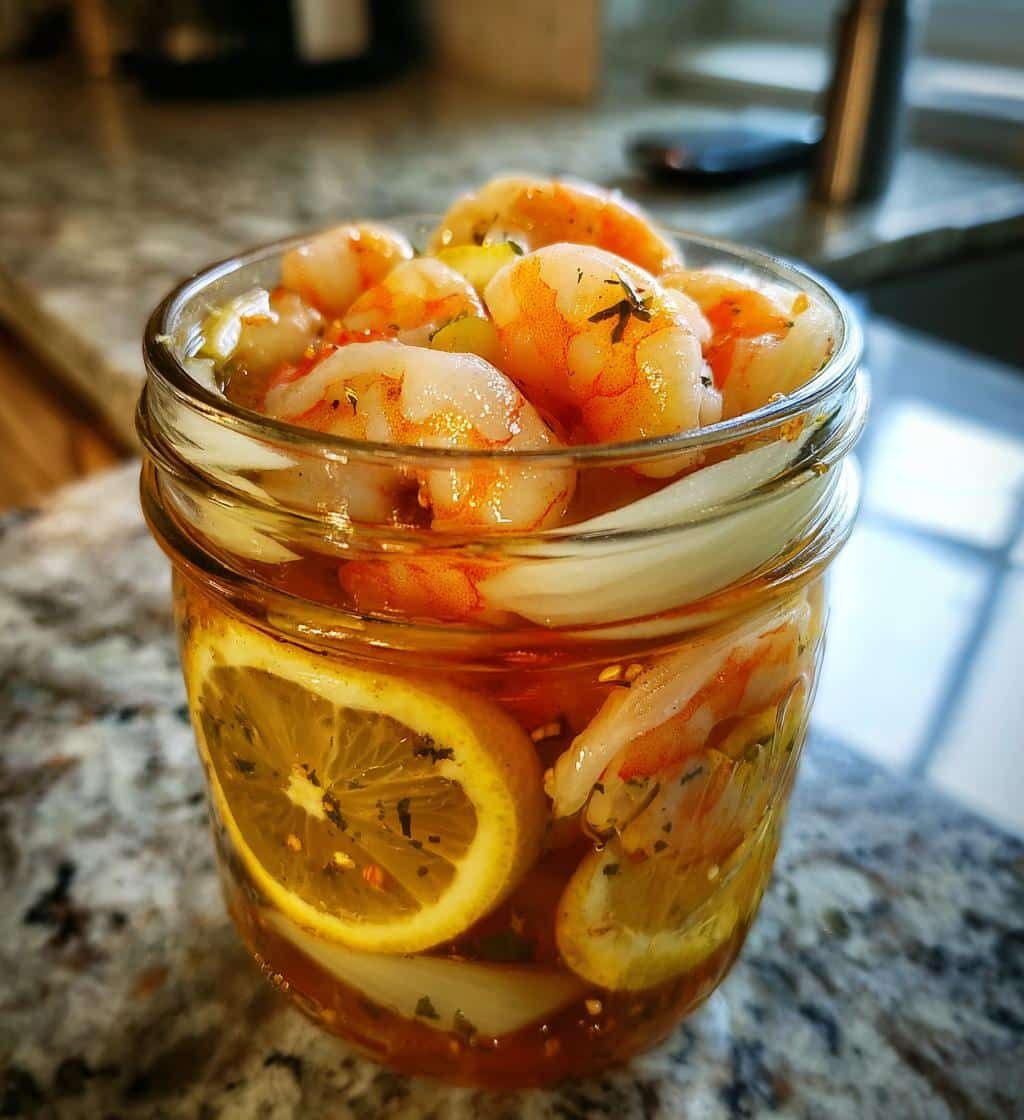
Pro tip from my many trial runs: use a 1-quart glass jar with a tight lid – those cute little pickling jars work perfectly. And don’t skip the lemon slices! They’re not just pretty – they infuse the shrimp with the most incredible citrusy brightness.
How to Make Pickled Shrimp 5 Irresistible Ways
Alright, let’s get down to business! Making pickled shrimp is easier than you think, but there are a few key steps you don’t want to rush. I’ve learned (the hard way!) that timing is everything with this recipe. Follow these steps, and you’ll have the most flavorful, perfectly textured pickled shrimp ready to wow your taste buds.
Step 1: Cooking the Shrimp
First things first – we need perfectly cooked shrimp. Bring a pot of water to a rolling boil (no salt needed, we’ll get plenty from the brine later). Drop in your peeled and deveined shrimp and set a timer immediately – 2 minutes for small shrimp, 3 minutes max for large ones. You’ll know they’re done when they curl into cute little “C” shapes and turn that gorgeous pink color.
Drain them immediately and spread them on a baking sheet to cool. Here’s my secret: I pop them in the fridge for 10 minutes to stop the cooking completely. This prevents them from getting rubbery – nobody wants overcooked shrimp!
Step 2: Preparing the Brine
While the shrimp cool, let’s make that magical brine. Combine vinegar, water, sugar, salt, peppercorns, mustard seeds and bay leaf in a saucepan. Bring it to a boil over medium-high heat, stirring just until the sugar dissolves. Then reduce to a simmer for exactly 5 minutes – this lets all those spices infuse their flavors beautifully.
Watch it closely – you want it bubbling gently, not boiling over! The aroma at this stage is incredible – that sharp vinegar mellows into something sweet and complex. Turn off the heat but keep the brine hot while you assemble the jar.
Step 3: Layering and Pickling
Now for the fun part! Grab your clean glass jar and start layering: a few shrimp, a couple lemon slices, some onion slices. Repeat until the jar is packed but not crammed – leave about an inch of space at the top. Pour the hot brine over everything, making sure all the shrimp are submerged.
Seal it tight and refrigerate for at least 4 hours, though overnight is even better. The wait is torture, I know! But trust me, those flavors need time to work their magic. Give the jar a gentle shake every now and then to redistribute the goodness.
Pro tip: If any floaters won’t stay under the brine, wedge a lemon slice on top to weigh them down. No shrimp left behind!
Why You’ll Love Pickled Shrimp 5 Irresistible Ways
Let me count the ways this recipe will steal your heart (and probably become your new go-to party trick)! I’ve made pickled shrimp more times than I can count, and here’s why it never gets old:
- Effortless elegance: Looks fancy but takes barely 15 minutes of active work – perfect for when you want to impress without stress
- Flavor that evolves: Starts good after 4 hours, but wait until day two when the shrimp soak up all those briny, citrusy, spicy notes
- Endless versatility: From fancy charcuterie boards to quick weeknight salads, these shrimp adapt to any occasion
- Crowd-pleasing tang: That perfect balance of sweet, sour and savory makes people go “Wow, what’s in this?” every single time
- Make-ahead magic: Stays fresh in the fridge for days, meaning less last-minute scrambling when guests arrive
My favorite thing? How these little shrimp transform everything they touch. Toss them in a salad and suddenly it’s gourmet. Plop them on a er and you’ve got instant appetizer gold. Even my picky nephew devours them – though he insists on calling them “flavor bombs” instead of pickled shrimp!
5 Ways to Serve Pickled Shrimp
Now for the best part – how to enjoy these tangy little beauties! I’ve experimented with pickled shrimp in every possible way (much to my family’s delight), and these five serving ideas always steal the show. Each one highlights the shrimp’s bright flavor in a completely different way – perfect for mixing things up!
Classic Appetizer with ers
This is how I first fell in love with pickled shrimp – piled high on buttery ers with a dollop of cream cheese. The creamy richness balances the shrimp’s zing perfectly. For parties, I arrange them on a platter with different ers and let guests build their own bites. Pro tip: Add a tiny sprinkle of fresh dill on top – it makes them look fancy with zero extra effort!
Refreshing Citrus Salad
My go-to summer lunch! Toss pickled shrimp with mixed greens, orange segments, avocado, and a light vinaigrette. The shrimp’s brine doubles as part of the dressing – just whisk in a bit of olive oil. The citrus from the shrimp pairs magically with fresh oranges. I sometimes add toasted almonds for crunch. This salad disappears fast at potlucks!
Spicy Bloody Mary Garnish
Game changer for brunch! Skip the boring celery stick and spear a few pickled shrimp on a skewer instead. They add the perfect savory kick to your cocktail. The brine even flavors the tomato juice if you let them soak a minute. My friends now demand “shrimp Marys” whenever I host – especially with an extra dash of hot sauce!
Southern-Style Po’ Boy Filling
Take your sandwich game to New Orleans levels! Layer pickled shrimp on crusty French bread with shredded lettuce, tomato slices, and remoulade sauce. The shrimp’s vinegar cuts through the richness beautifully. I like to toast the bread lightly first – the contrast of warm, crispy bread and chilled shrimp is incredible. Don’t forget the pickles on the side!
Quick Avocado Toast Topping
My favorite lazy gourmet breakfast! Mash ripe avocado on toasted sourdough, then crown it with pickled shrimp and a sprinkle of everything bagel seasoning. The creamy avocado mellows the shrimp’s tang while the brine keeps the toast from drying out. Sometimes I add a soft-boiled egg for extra protein – absolute perfection with coffee on weekend mornings.
The beauty of pickled shrimp? Once you try these ideas, you’ll start inventing your own combinations. I’ve tossed them in pasta, stirred them into potato salad, even used them as pizza toppings! That versatile flavor profile works with almost anything. What will you try first? For more appetizer inspiration, check out these appetizer and snack recipes!
Expert Tips for Perfect Pickled Shrimp
After making more batches of pickled shrimp than I can count (and yes, a few disasters along the way!), I’ve learned all the tricks for flawless results every time. These are the little things that take your pickled shrimp from good to “Oh my gosh, give me the recipe!” amazing.
Choosing and prepping your shrimp
Freshness is everything here. Look for shrimp that smell like the ocean – not fishy at all. I always buy them the day I plan to pickle. Frozen works in a pinch, but thaw them slowly in the fridge first. And whatever you do, don’t skip deveining! Those little digestive tracts can make your brine cloudy and affect the flavor.
Size matters too – medium (41/50 count) shrimp pickle most evenly. Giant shrimp can get rubbery, while tiny ones disappear in the brine. Leave the tails on if you’re feeling fancy (they make great handles for appetizers!), but remove them if you’re adding to salads.
Balancing your brine
The vinegar-to-water ratio is sacred in my kitchen – too much vinegar and it’ll make your eyes water, too little and you lose that signature tang. If you’re nervous, start with 3/4 cup vinegar and 3/4 cup water, then adjust next time. Taste your brine before pouring – it should make your lips pucker slightly but still have rounded sweetness.
Here’s my secret weapon: add a tablespoon of the shrimp cooking water to the brine. It adds subtle seafood depth that store-bought pickles can’t match. Just don’t tell my Southern grandma I shared that trick!
Storage smarts
Glass jars are non-negotiable – metal lids can react with the vinegar. I reuse pasta sauce jars after a good sterilizing. Always leave about an inch of headspace to prevent overflow as the shrimp absorb liquid. If your fridge smells like vinegar after a day, wrap the jar’s lid tightly with plastic wrap before screwing it on.
The biggest mistake? Impatience! Those shrimp need at least 4 hours to pickle properly, but 24 hours is magic. Flip the jar upside down occasionally to redistribute flavors – just make sure the lid’s on tight first (learned that the messy way!).
One last pro tip: label your jars with the date. These shrimp are so addictive, you’ll forget whether that batch is two days old or five (they keep up to 5 days refrigerated). Not that they ever last that long in my house!
Ingredient Substitutions & Notes
Listen, I know we don’t always have exactly what a recipe calls for – and that’s okay! Over the years, I’ve tested all sorts of swaps for pickled shrimp ingredients. Here are my tried-and-true substitutions that still deliver amazing flavor, plus some handy notes I wish I’d known sooner.
Vinegar Variations
White vinegar gives that classic sharp tang, but apple cider vinegar works beautifully if that’s what you’ve got. It adds a subtle fruity note that pairs wonderfully with the shrimp. Just avoid balsamic or red wine vinegar – their colors turn everything unappetizingly dark. Rice vinegar? Too mild. Stick with the sharper varieties for best results.
Sweetener Options
That quarter cup of sugar balances the acidity perfectly, but honey or maple syrup can step in if you’re out. Use 3 tablespoons instead of 1/4 cup since they’re sweeter. Artificial sweeteners? Not worth it – they leave a weird aftertaste with pickling. For a sugar-free version, I sometimes use monk fruit sweetener, but the texture changes slightly.
Spice Swaps
No mustard seeds? A teaspoon of dry mustard powder works in a pinch. Out of bay leaves? Skip them rather than using old, flavorless ones. For extra kick, I sometimes add a sliced jalapeño or a pinch of red pepper flakes to the brine – just warn your guests!
Shrimp Shortcuts
Fresh is best, but frozen raw shrimp (thawed properly) work nearly as well. Just avoid pre-cooked shrimp – they get rubbery when pickled. And if you’re pressed for time, many fish counters will peel and devein shrimp for you (worth every penny!).
Lemon & Onion Notes
No fresh lemon? Two tablespoons of bottled lemon juice can substitute, but you’ll miss those pretty slices. Red onions make a gorgeous pink brine, but yellow or white work fine. Just slice them paper-thin – thick chunks won’t pickle properly.
Remember: pickled shrimp is forgiving! The core flavors come through even with substitutions. My motto? Don’t stress over perfection – just enjoy the delicious results! If you’re interested in other ways to use vinegar in cooking, check out this onion boil recipe which utilizes vinegar for flavor.
Storage & Reheating
Okay, let’s talk about keeping your pickled shrimp at their absolute best – because I know you’ll want to make extra batches once you taste how amazing they are! Proper storage makes all the difference between shrimp that stay plump and flavorful versus ones that turn mushy or lose their spark.
Refrigerator Storage
Always keep your pickled shrimp chilled – that brine is magic, but it’s not shelf-stable magic. I store mine in the same glass jar I used for pickling, making sure the shrimp stay completely submerged in liquid. They’ll keep beautifully for 3-5 days in the fridge, though in my house they never last that long!
Pro tip: If you notice the brine getting cloudy after a couple days, don’t panic! It’s just proteins from the shrimp leaching out – totally normal and safe. But if it starts smelling funky (not just vinegary), toss it immediately.
Freezing? Don’t Do It!
I learned this the hard way – frozen pickled shrimp turn into rubbery little pucks. The texture completely changes when thawed, and not in a good way. The vinegar brine also seems to intensify when frozen, making the shrimp taste harsh. Trust me, it’s better to make smaller batches more frequently than try to freeze leftovers.
To Reheat or Not to Reheat?
Here’s the thing – pickled shrimp are meant to be enjoyed cold! Heating them up makes the texture weird and dulls all those bright, tangy flavors we worked so hard to develop. If you absolutely must warm them (maybe for a hot sandwich?), do it gently in the microwave for just 10-15 seconds max.
My favorite way to enjoy them slightly less chilled? Let the jar sit on the counter for about 10 minutes before serving. This takes the edge off the fridge-cold temperature while keeping all the perfect textures intact.
One last storage secret: The onions and lemon slices get more delicious each day! By day three, they’re practically candy – I sometimes fish them out to garnish other dishes. Just be sure to use clean utensils when serving to prevent contamination. Now go enjoy those perfectly preserved shrimp!
Nutritional Information
Okay, let’s talk numbers – but remember, these are just ballpark figures! Exact nutrition varies based on your specific ingredients (like how much brine the shrimp actually absorb). I’ve calculated this based on eating about 1/4 pound of the pickled shrimp with some of that delicious onion and lemon goodness mixed in.
- Serving Size: 1/4 lb pickled shrimp with brine veggies
- Calories: Around 120 (mostly from that protein-packed shrimp!)
- Sugar: 5g (from our brine’s sugar and natural shrimp sweetness)
- Sodium: 800mg (hey, it’s a pickle – but you can reduce salt slightly if needed)
- Fat: Just 1g (and most of that’s the good unsaturated kind from the shrimp)
- Protein: A whopping 18g per serving – makes this snack surprisingly filling
A quick disclaimer: These values can change based on your exact ingredients. Used organic cane sugar instead of white? That might tweak the numbers slightly. Super-jumbo shrimp instead of medium? More protein! The beauty is that no matter how you slice it, pickled shrimp remain a relatively light yet satisfying option compared to other appetizers.
My nutritionist friend loves that this recipe packs so much flavor without heavy creams or oils. And since the shrimp are the star, you’re getting all those wonderful seafood nutrients too – omega-3s, selenium, vitamin B12. Just maybe balance it with some water if you’re watching sodium intake – that brine packs a punch!
Frequently Asked Questions
Q1. Can I freeze pickled shrimp?
Oh honey, don’t do it! I tried freezing a batch once (thinking I was so clever for meal prep) and ended up with rubbery little shrimp pucks. The texture completely changes when thawed – they get weirdly mushy yet tough at the same time. Plus, the vinegar flavor intensifies in all the wrong ways. Stick to fresh batches – they come together so quickly anyway!
Q2. How long does pickled shrimp keep in the fridge?
In my experience, they’re at their absolute best within 3-5 days. The flavors keep developing over time – day two is actually my favorite! Just make sure they’re always submerged in brine and stored in a tightly sealed glass jar. If the liquid gets cloudy (totally normal) or develops an off smell (not just vinegary), it’s time to say goodbye.
Q3. Can I use cooked shrimp instead of raw?
I wouldn’t recommend it, friend. Pre-cooked shrimp tend to get tough and rubbery when pickled. The magic happens when raw shrimp absorb all that flavorful brine as they chill. If you must use cooked shrimp, reduce the pickling time to just 2 hours max – but fresh is definitely worth the extra step!
Q4. What’s the best way to serve pickled shrimp at a party?
My go-to is a simple appetizer platter with buttery ers, cream cheese, and lemon wedges. For bigger gatherings, I’ll spear a few shrimp with cocktail picks alongside olives and cheese cubes. The brine makes a fantastic dipping sauce too – just reduce it slightly on the stove for thicker consistency. Watch how fast they disappear!
Q5. Can I reuse the pickling brine?
Technically yes, but I don’t recommend it. The brine absorbs flavors from the shrimp and aromatics, so second batches never taste quite as bright. Instead, save any extra brine to marinate chicken or dress salads – it adds incredible flavor! Just be sure to boil it first if you’re worried about seafood safety.
5 Irresistible Pickled Shrimp Recipes That Will Wow You
- Total Time: 4 hours 25 mins
- Yield: 4 servings 1x
- Diet: Low Calorie
Description
Discover five delicious ways to enjoy pickled shrimp, perfect for appetizers, salads, or snacks.
Ingredients
- 1 lb shrimp, peeled and deveined
- 1 cup white vinegar
- 1/2 cup water
- 1/4 cup sugar
- 1 tbsp salt
- 1 tsp black peppercorns
- 1 tsp mustard seeds
- 1 bay leaf
- 1 lemon, sliced
- 1 small onion, thinly sliced
Instructions
- Boil shrimp for 2-3 minutes until pink. Drain and cool.
- Combine vinegar, water, sugar, salt, peppercorns, mustard seeds, and bay leaf in a saucepan. Bring to a boil, then simmer for 5 minutes.
- Layer shrimp, lemon slices, and onion in a jar.
- Pour hot brine over the shrimp. Seal and refrigerate for at least 4 hours.
- Serve chilled as an appetizer, in salads, or with ers.
Notes
- Use fresh shrimp for best results.
- Adjust sugar and vinegar to taste.
- Store in the fridge for up to 3 days.
- Prep Time: 15 mins
- Cook Time: 10 mins
- Category: Appetizer
- Method: Pickling
- Cuisine: American
Nutrition
- Serving Size: 1/4 lb
- Calories: 120
- Sugar: 5g
- Sodium: 800mg
- Fat: 1g
- Saturated Fat: 0g
- Unsaturated Fat: 0.5g
- Trans Fat: 0g
- Carbohydrates: 8g
- Fiber: 1g
- Protein: 18g
- Cholesterol: 150mg
Keywords: pickled shrimp, appetizer, seafood, easy recipe