
Oh my gosh, you have to try these air fryer stuffed pita pockets – they’re my new obsession for busy weeknights! I stumbled upon this trick when my kids were begging for “something crunchy” and I needed dinner on the table in 15 minutes flat. That magical air fryer transforms regular pita bread into this golden, crispy wonder while keeping the insides perfectly melty. The best part? You can stuff them with literally anything – leftover chicken, random veggies from your fridge drawer, even last night’s taco meat. My husband now requests these at least twice a week, and I don’t mind one bit because cleanup is a breeze!
Why You’ll Love These Air Fryer Stuffed Pita Pockets
Let me count the ways these little pockets of joy will rock your world:
- Crazy fast: From fridge to plate in under 20 minutes – my record is 14 when I was really hungry!
- Perfect crispiness: That air fryer magic gives you a satisfying crunch without drying out the filling
- Your rules: Swap in whatever you’ve got – tofu, turkey, even scrambled eggs work great
- Secretly healthy: Packs in veggies your kids won’t even notice (shhh!)
- No-fuss cleanup: One bowl to mix, no pots to scrub – my kind of cooking
Trust me, once you try these, you’ll be stuffing pitas with everything but the kitchen sink!
Ingredients for Air Fryer Stuffed Pita Pockets
Here’s everything you’ll need to make these crispy, flavorful pockets – I promise it’s all simple stuff you probably have already! (And if not, substitutions are totally fine – more on that later.)
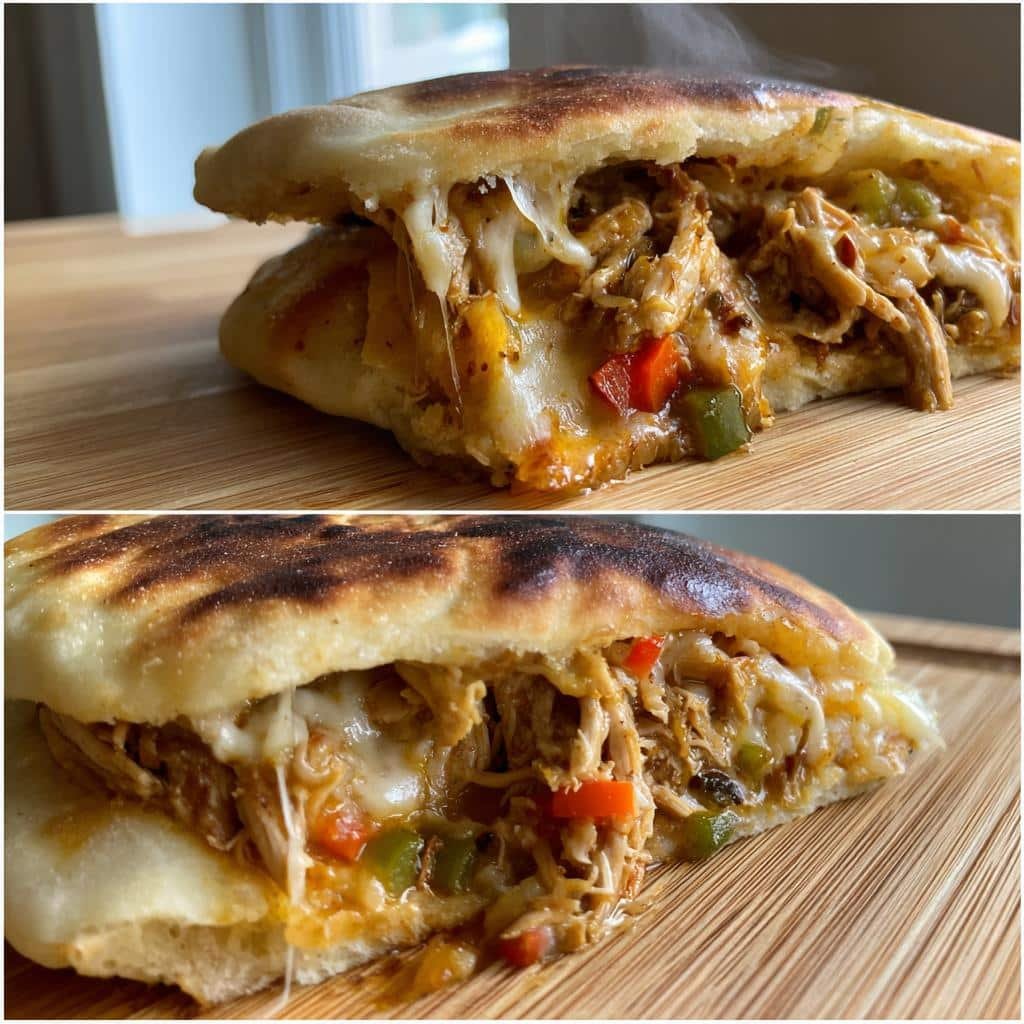
- 4 pita bread pockets – the kind with pockets, not flatbread! Mine were about 6 inches across
- 1 cup cooked chicken, shredded – leftover rotisserie chicken works wonders here
- 1/2 cup chopped bell peppers – I use whatever color’s cheapest, but red adds nice sweetness
- 1/4 cup diced onions – yellow or red both work great
- 1/2 cup shredded cheese – my go-to is Mexican blend, but cheddar or mozzarella are perfect too
- 1 tsp olive oil – just enough to make those pitas golden and crispy
- 1 tsp garlic powder – the secret flavor booster in my house
- 1 tsp paprika – adds that gorgeous color and subtle smokiness
- Salt and pepper to taste – I always do a few generous pinches of each
See? Nothing fancy! Now let’s get stuffing…
Equipment You’ll Need
Here’s the short and sweet list of what you’ll need to make these pita pockets – I promise it’s nothing fancy! (Because who has time to dig through kitchen gadgets?)
- An air fryer – any size works, but I use my basic 3.5-quart model for this
- One medium mixing bowl – the one you use for salads is perfect
- A silicone brush – or just use your fingers to spread the oil if you’re lazy like me sometimes
- Measuring spoons – eyeballing works too, but I’m a rebel like that
That’s seriously it! No fancy tools, no special attachments – just grab these basics and let’s make some magic happen.
How to Make Air Fryer Stuffed Pita Pockets
Okay, let’s get to the fun part – making these crispy little pockets of deliciousness! I’ll walk you through each step so they turn out perfect every time. (And don’t worry if yours don’t look Instagram-worthy at first – mine sure didn’t when I started!)
Preparing the Filling
First, grab that mixing bowl and let’s make the magic happen. Dump in your shredded chicken, chopped bell peppers, onions, and cheese. Now here’s my secret – sprinkle in the garlic powder, paprika, salt, and pepper, then give it all a good mix with your hands. (Wash ’em first, please!) The hands-on approach helps distribute the seasonings evenly. Taste a pinch – want more kick? Add another dash of paprika or some chili flakes. Too bland? More garlic powder never hurt anyone! The filling should be moist but not wet – if it looks dry, add a teaspoon of mayo or Greek yogurt.
Stuffing and Cooking the Pita Pockets
Now, preheat your air fryer to 375°F (190°C) – this takes about 3 minutes in mine. While that’s heating, gently open each pita pocket (careful not to tear them!) and stuff with about 1/4 cup of filling. Don’t overstuff – trust me, I learned the hard way that bursting pitas make a mess! Lightly brush the outside with olive oil – this gives that perfect golden crisp. Pop them in the air fryer basket, leaving space between each. Cook for 5-7 minutes until beautifully golden – no need to flip! The first time I made these, I kept peeking (okay, I still do) – you’ll know they’re done when the cheese starts oozing and the pita gets that irresistible crunch.
Tips for Perfect Air Fryer Stuffed Pita Pockets
After making these at least twice a week for months (no exaggeration!), I’ve learned all the tricks to pita pocket perfection. Here’s what I wish I’d known when I started:
- Size matters: Use medium pitas (about 6 inches) – the big ones never crisp evenly in my air fryer
- The Goldilocks rule: Stuff just enough filling to feel plump but not bursting – about 1/4 cup per pita
- Oil lightly: Too much olive oil makes them greasy; a thin brushed layer gives perfect crispness
- Preheat is key: That 3-minute wait makes all the difference for even cooking – no soggy bottoms!
- Peek responsibly: Check at 5 minutes, but resist opening too often – heat loss means longer cooking
- Hot filling hack: If using cold leftovers, microwave the mixture 30 seconds before stuffing – helps melt cheese faster
- Crisp rescue: If pockets feel soft, cook 1 more minute – they crisp up FAST at the end
My biggest “oops” moment? Overstuffing led to exploded pockets (still tasty though!). Now I know better – and so do you!
Variations for Air Fryer Stuffed Pita Pockets
Oh, the possibilities! One of my favorite things about these pita pockets is how easily you can mix things up based on what’s in your fridge or your mood. Here are some of my go-to variations that always get rave reviews:
- Vegetarian delight: Swap chicken for crumbled tofu (squeeze out excess water first!) or black beans mashed with a fork
- Cheese swap: Try feta for a tangy kick or pepper jack if you like it spicy – my kids love string cheese pulled apart into strips!
- Breakfast twist: Scrambled eggs, diced ham, and cheddar make an amazing morning version (cook just 4 minutes)
- Greek style: Chopped kalamata olives, spinach, and tzatziki sauce mixed right into the filling
- Pizza pockets: Pepperoni, marinara, and mozzarella – bonus points if you sprinkle Italian seasoning on the outside
- Leftover magic: Last night’s taco meat? Perfect! Stir-fry veggies? Yes! Even chopped meatloaf works surprisingly well
The only rule? Have fun with it! Some of my best creations came from “clean out the fridge” experiments. Just keep the total filling amount about the same (1/4 cup per pita) and you really can’t go wrong.
Serving Suggestions
Now that you’ve got these crispy golden pockets ready, let’s talk about how to serve them up! My family likes to make a whole meal out of these with simple sides – here are our favorite ways to enjoy them:
- Cool & creamy: A simple yogurt dip (Greek yogurt + lemon juice + minced garlic) is perfect for dunking
- Crunchy side: Baby carrots and cucumber slices add fresh contrast to the warm, crispy pitas
- Light salad: Toss together some greens with olive oil and lemon – the acidity cuts through the richness
- Soup pairing: Tomato soup makes these feel extra cozy on chilly days
- Pickle power: A few dill pickle spears on the side? Yes please – the tangy crunch is amazing
Honestly though? These are so good they don’t need sides – I’ve been known to eat them straight from the air fryer basket while standing at the counter! But if you’re serving guests or want to fancy it up, these simple pairings always work wonders.
Storing and Reheating Air Fryer Stuffed Pita Pockets
Okay, let’s be real – these pita pockets are so delicious you’ll probably eat them all right away! But if you somehow end up with leftovers (it happens!), here’s exactly how to keep them tasting fresh and crispy:
Fridge storage: Let the pockets cool completely before storing – about 15 minutes. Pop them in an airtight container with parchment paper between layers to prevent sticking. They’ll keep beautifully for 2-3 days in the fridge. (I’ve pushed it to 4 days once when desperate – still good but the pita loses some crisp.)
Freezer trick: For longer storage, wrap each pocket individually in foil, then place in a freezer bag. They’ll stay good for 1 month – perfect for quick lunches! Just write the date on the bag because freezer amnesia is real.
Reheating magic: The air fryer is your best friend here! For fridge leftovers, reheat at 350°F (175°C) for 3-4 minutes until warmed through. Straight from frozen? No thawing needed – just add an extra minute or two. Pro tip: spritz with a tiny bit of water before reheating to prevent drying out.
Microwave option: In a pinch, 30 seconds on high works, but the pita won’t stay crispy. If you go this route, I like to finish with 1 minute in the toaster oven to bring back some crunch.
One last storage secret: keep any extra filling separate if possible – it stores better on its own for up to 4 days. Then just stuff fresh pitas when ready to eat! Works like a charm for meal prep Sundays.
Nutritional Information
Now, I’m no nutritionist (just a home cook who loves good food!), but here’s the nutritional breakdown per pita pocket based on the ingredients I use. Remember – these are estimates, and your exact numbers might vary depending on your specific ingredients and how generous you are with that cheese!
- Calories: About 250 per stuffed pita – not bad for such a satisfying meal!
- Protein: 15g – thanks to that chicken and cheese combo keeping you full
- Carbs: 30g – the pita contributes most of this
- Fiber: 3g – those sneaky veggies doing good work
- Sugar: 2g – just the natural stuff from the peppers and onions
- Fat: 8g total (3g saturated) – the olive oil and cheese doing their thing
Here’s my favorite part – this meal is naturally balanced without even trying! You’ve got carbs for energy from the pita, protein from the chicken and cheese, healthy fats from the olive oil, and fiber from the veggies. I feel way better serving these than frozen chicken nuggets (though we definitely have those nights too!).
Want to lighten it up? Use low-fat cheese or add extra veggies to bulk up the filling with fewer calories. Need more protein? Double the chicken! That’s the beauty of homemade – you’re in complete control.
Frequently Asked Questions
You’ve got questions? I’ve got answers! After making these air fryer stuffed pita pockets countless times (and fielding texts from friends trying the recipe), here are the most common questions that pop up:
Can I use whole wheat pita bread?
Absolutely! Whole wheat pitas work great – they might need an extra minute in the air fryer to crisp up perfectly. I actually love the nutty flavor they add. Just make sure they’re the pocket kind, not flatbreads, or the filling will fall right out.
How long should I reheat leftovers?
If you’ve got fridge leftovers, pop them back in the air fryer at 350°F (175°C) for 3-4 minutes – they’ll come out nearly as crispy as fresh! Frozen ones take about 5-6 minutes straight from the freezer. My trick? Spritz with a tiny bit of water first to prevent drying out.
Can I prep these ahead of time?
You bet! I often mix the filling the night before and store it separately. The key is waiting to stuff the pitas until right before cooking – otherwise they can get soggy. Assembled pockets can sit at room temp for about 30 minutes if needed while you preheat the air fryer.
Why did my pita pocket burst open?
Probably overstuffing – been there! Stick to about 1/4 cup filling per medium pita. Also, make sure to open the pocket gently without tearing the edges. If they do split, no worries – they’ll still taste amazing, just maybe not as pretty!
Can I make these without an air fryer?
While the air fryer gives that unbeatable crispiness, you can bake them at 400°F (200°C) for 8-10 minutes instead. The texture won’t be quite the same, but still delicious! Just brush both sides with oil and flip halfway through.

Crispy Air Fryer Stuffed Pita Pockets in 20 Minutes Flat
- Total Time: 17 mins
- Yield: 4 pita pockets 1x
- Diet: Low Lactose
Description
Crispy air-fried pita pockets filled with a savory stuffing, perfect for a quick and delicious meal.
Ingredients
- 4 pita bread pockets
- 1 cup cooked chicken, shredded
- 1/2 cup chopped bell peppers
- 1/4 cup diced onions
- 1/2 cup shredded cheese
- 1 tsp olive oil
- 1 tsp garlic powder
- 1 tsp paprika
- Salt and pepper to taste
Instructions
- Preheat the air fryer to 375°F (190°C).
- Mix the shredded chicken, bell peppers, onions, cheese, garlic powder, paprika, salt, and pepper in a bowl.
- Stuff each pita pocket with the filling.
- Brush the outside of the pita pockets lightly with olive oil.
- Place the pita pockets in the air fryer basket and cook for 5-7 minutes, or until golden and crispy.
- Serve hot.
Notes
- You can substitute chicken with tofu or beans for a vegetarian option.
- Add hot sauce for extra spice.
- Serve with a side of yogurt or tzatziki for dipping.
- Prep Time: 10 mins
- Cook Time: 7 mins
- Category: Main Dish
- Method: Air Fryer
- Cuisine: Mediterranean
Nutrition
- Serving Size: 1 pita pocket
- Calories: 250
- Sugar: 2g
- Sodium: 400mg
- Fat: 8g
- Saturated Fat: 3g
- Unsaturated Fat: 4g
- Trans Fat: 0g
- Carbohydrates: 30g
- Fiber: 3g
- Protein: 15g
- Cholesterol: 35mg
Keywords: air fryer, stuffed pita pockets, quick meal, crispy, chicken pita