
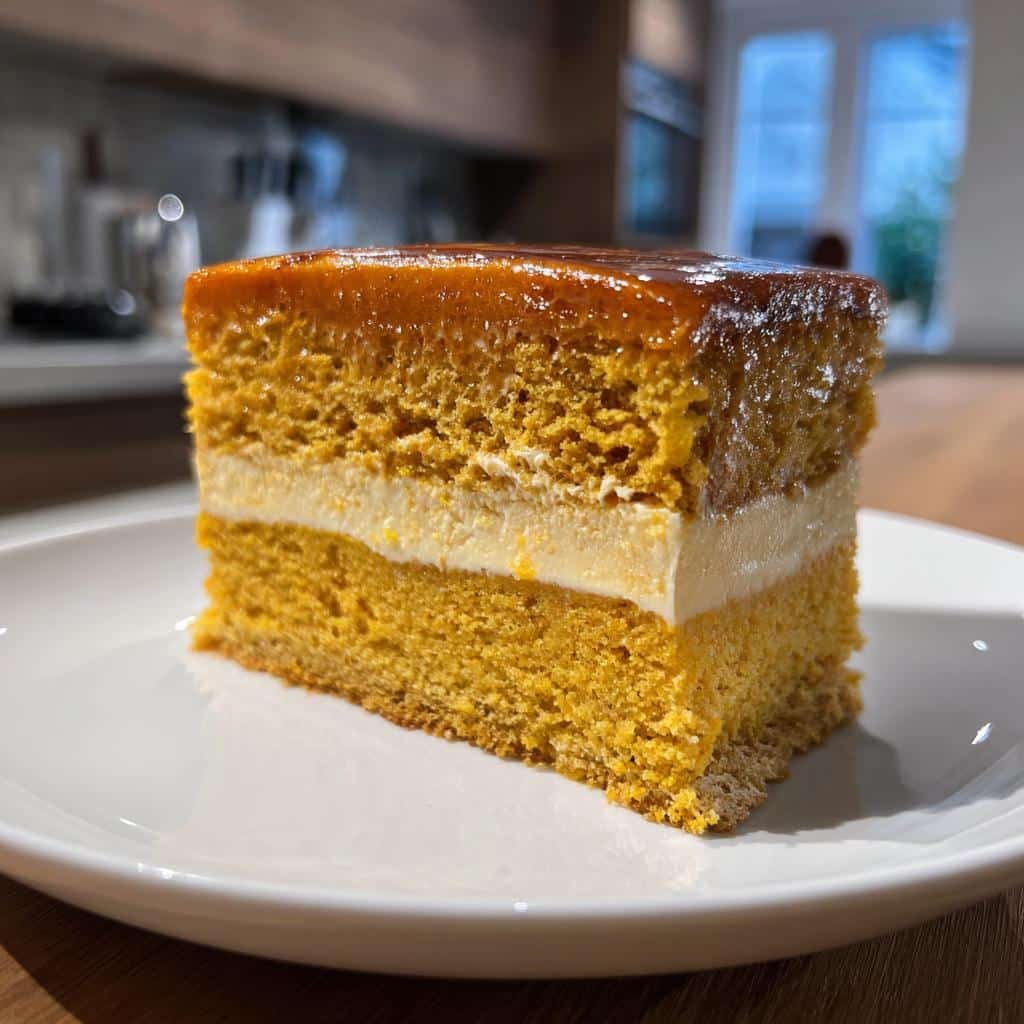
Oh my gosh, have you ever seen a cake work actual magic right in your oven? This pumpkin magic cake will blow your mind! It starts as one simple batter, but while baking, it transforms into three gorgeous layers – a creamy custard bottom, a spiced pumpkin middle, and a light sponge cake top.
The first time I made it, I was convinced I’d messed up – until I sliced into it and saw those perfect stripes! Now it’s my go-to fall dessert because it looks impressive but secretly couldn’t be easier. Warm cinnamon and pumpkin flavors make it taste like autumn in every bite. Seriously, this pumpkin magic cake is the kind of dessert that makes people think you’re a baking wizard!
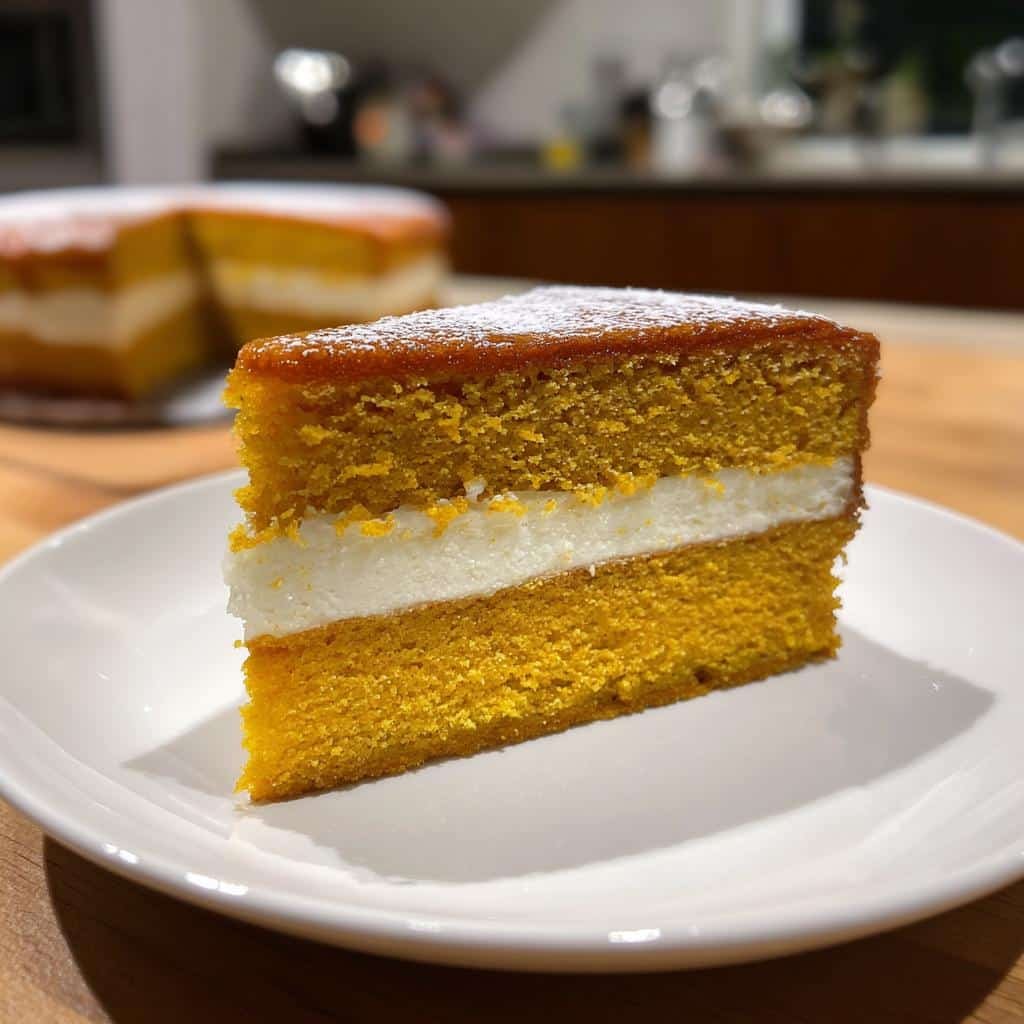
Table of Contents
Why You’ll Love This Pumpkin Magic Cake
Listen, this isn’t just any dessert – it’s pure baking sorcery that will have you grinning like a kid at a magic show! Here’s why:
- Easiest “wow factor” ever: One bowl, one pour, and your oven does all the fancy layering work
- Texture heaven: Creamy custard meets fluffy cake in every forkful
- Fall flavors that hug your soul: Pumpkin spice with vanilla warmth
- Impossible to mess up: Even my most baking-challenged friends nail this
Three Layers of Delight
Watching this pumpkin magic cake transform is like seeing a baking miracle unfold! The batter separates into:
- A silky custard base that jiggles just right
- A spiced pumpkin middle packed with cozy flavor
- A golden sponge top that’s lighter than air
And the best part? You don’t have to do anything special – the magic happens all by itself while it bakes! Pair your slice of magic cake with a cozy Cracking Latte — it’s the ultimate fall combo you didn’t know you needed!
Perfect for Any Occasion
This pumpkin magic cake has saved my reputation more times than I can count:
- Thanksgiving hero: Brings festive flair without last-minute stress
- Potluck superstar: Always disappears first from the dessert table
- Weeknight happiness: Because Tuesday deserves pumpkin magic too!
Seriously, I’ve served this everywhere from fancy dinner parties to kids’ pajama brunches – it always gets the same reaction: “How did you DO that?!” (My secret? I let the cake do all the work!)
Print
Unbelievable Pumpkin Magic Cake: 3 Layers in 1 Batter!
- Total Time: 75 minutes
- Yield: 8 servings 1x
- Diet: Vegetarian
Description
A simple and delicious pumpkin magic cake with layers of custard, pumpkin, and sponge.
Ingredients
- 1/2 cup unsalted butter, melted
- 2 cups milk
- 4 eggs
- 1 1/2 cups granulated sugar
- 1/2 cup pumpkin puree
- 1 teaspoon vanilla extract
- 3/4 cup all-purpose flour
- 2 teaspoons pumpkin pie spice
- 1/4 teaspoon salt
Instructions
- Preheat oven to 325°F (165°C). Grease an 8-inch baking dish.
- Whisk melted butter, milk, eggs, sugar, pumpkin puree, and vanilla until smooth.
- Sift flour, pumpkin pie spice, and salt into the wet mixture. Stir gently.
- Pour batter into the prepared dish. Bake for 50-60 minutes.
- Let cool completely before slicing.
Notes
- Store leftovers in the refrigerator.
- Serve chilled for best texture.
- Prep Time: 15 minutes
- Cook Time: 60 minutes
- Category: Dessert
- Method: Baking
- Cuisine: American
Nutrition
- Serving Size: 1 slice
- Calories: 280
- Sugar: 25g
- Sodium: 120mg
- Fat: 12g
- Saturated Fat: 7g
- Unsaturated Fat: 4g
- Trans Fat: 0g
- Carbohydrates: 38g
- Fiber: 1g
- Protein: 5g
- Cholesterol: 110mg
Keywords: pumpkin magic cake, easy dessert, fall baking
Ingredients for Pumpkin Magic Cake
Here’s the beautiful part – you probably have most of this in your kitchen already! Just a handful of simple ingredients come together to create pumpkin magic:
- 1/2 cup unsalted butter, melted and slightly cooled (I pop mine in the microwave for 30-second bursts – no fancy equipment needed!)
- 2 cups whole milk, at room temperature (this helps prevent the butter from hardening when you mix it in)
- 4 large eggs, separated (keep those yolks and whites apart – we’ll use both!)
- 1 1/2 cups granulated sugar (I sometimes swap 1/4 cup with brown sugar for extra warmth)
- 1/2 cup pumpkin puree, packed (not pie filling! The pure stuff with no added spices)
- 1 teaspoon vanilla extract (the good stuff – it makes a difference!)
- 3/4 cup all-purpose flour, spooned and leveled (don’t scoop or you’ll pack too much!)
- 2 teaspoons pumpkin pie spice (or make your own blend with cinnamon, ginger, nutmeg)
- 1/4 teaspoon salt (just enough to make all the flavors pop)
See? Nothing crazy! The magic isn’t in fancy ingredients – it’s in how these everyday pantry staples transform when baked together. Pro tip: I always measure everything before starting (my grandma called this “mise en place”) so I’m not scrambling mid-recipe!
How to Make Pumpkin Magic Cake
Okay, here’s where the real fun begins! Don’t let the “magic” part intimidate you – this is actually one of the easiest cakes you’ll ever make. Just follow these simple steps, and let your oven work its spell:
Step 1: Prep the Batter
First, grab your biggest mixing bowl (trust me, you’ll want the extra space!) and whisk together the melted butter and sugar until they’re best friends. Then add those egg yolks one at a time, whisking well after each – this is what gives our cake that rich custard layer! Pour in the milk slowly while whisking (no splatters, please!), then add the pumpkin puree and vanilla. Keep whisking until everything is smooth and gorgeous, like a pumpkin-spiced latte. Don’t worry if it looks a bit thin – that’s exactly what we want!
Step 2: Combine Dry Ingredients
Now for the secret to that perfect texture: sifting! Grab a fine mesh strainer and sift together the flour, pumpkin pie spice, and salt right over the wet ingredients. This little step makes ALL the difference – no lumpy cake here! Gently fold everything together with a spatula until just combined. Lazy folds, not vigorous stirring – we want to keep that batter light and happy. You’ll still see some small flour streaks, and that’s totally fine!
Step 3: Bake to Perfection
Here comes the magic show! Pour your batter into the prepared pan (it’ll look suspiciously liquidy – that’s normal!) and slide it into your preheated 325°F oven. Now walk away for 50 minutes – no peeking! When you come back, you should see golden edges and the center should be set but still have a slight jiggle (like Jell-O, not like a waterbed). A toothpick in the center should come out mostly clean with just a few moist crumbs. Let it cool completely in the pan – I know it’s hard to wait, but those layers need time to set up properly. The reward? Slicing into that beautiful tri-layer masterpiece!
Pro tip: I always do the “finger test” too – gently press the center. If it springs back slowly and leaves just a slight indent, it’s done. If your finger sinks in, give it 5 more minutes. The waiting is the hardest part, but that first bite makes it all worth it!
Tips for the Best Pumpkin Magic Cake
After making this pumpkin magic cake more times than I can count (okay, maybe I have a problem!), I’ve learned a few tricks to guarantee perfection every time:
- Don’t overmix! A few flour streaks are fine – vigorous stirring ruins the magic layers.
- Room temp ingredients matter. Cold milk can make the butter seize up. I leave mine out for 30 minutes before baking.
- Patience is key. That jiggly center will set as it cools – cutting too soon turns layers to mush.
- Glass pans work best for even heating, but if using metal, reduce oven temp by 25°F.
- Chill before serving. That custard layer firms up beautifully in the fridge.
Remember – the “magic” happens because of the batter’s thin consistency, so don’t panic when it looks too runny going into the oven. Just trust the process and your nose (when your kitchen smells like pumpkin spice heaven, you’re on the right track!).
Serving and Storing Pumpkin Magic Cake
Here’s the best part – enjoying your pumpkin magic cake creation! I’ve learned through lots of taste-testing (tough job, I know) exactly how to make this dessert shine from first slice to last crumb.
For serving: Resist the urge to dive in right away! Let the cake cool completely at room temperature, then pop it in the fridge for at least 2 hours – I promise the wait is worth it. Chilling firms up that dreamy custard layer and makes clean slices possible. Use a sharp knife dipped in hot water between cuts for picture-perfect wedges. My favorite way to serve? A simple dusting of powdered sugar or drizzle of caramel sauce lets the natural flavors shine.
Storage tips: This cake keeps beautifully in the fridge for 3-4 days – just cover it tightly with plastic wrap or transfer slices to an airtight container. The flavors actually deepen overnight! If you want to freeze it (smart thinking for future you!), wrap individual slices in plastic, then foil, and store for up to 2 months. Thaw overnight in the fridge before serving.
One last pro tip: If you do reheat a slice (though it’s divine cold), 10 seconds in the microwave brings back that just-baked warmth without melting the layers. But honestly? I usually eat it straight from the fridge with my fingers when no one’s looking – don’t judge!
Pumpkin Magic Cake Variations
One of the best things about this pumpkin magic cake is how easily you can tweak it to match your mood or pantry! Here are my favorite twists that still keep all the magical layering action:
Spice It Your Way
Don’t have pumpkin pie spice? No worries! Mix up your own blend with:
- 1 1/2 tsp cinnamon
- 1/4 tsp nutmeg
- 1/4 tsp ginger
- Pinch of cloves
Or for extra warmth, add a teaspoon of chai tea powder – it gives the most delicious autumnal kick! I sometimes throw in orange zest too for a bright citrus note that plays beautifully with the pumpkin.
Gluten-Free Magic
This cake works wonderfully with a 1:1 gluten-free flour blend (I like the ones with xanthan gum already added). Just be sure to:
- Let the batter rest for 5 minutes before baking
- Check doneness 5 minutes earlier than the recipe states
The layers might be slightly less defined but still taste absolutely incredible! My gluten-sensitive aunt says this version tastes even better than the original – high praise!
Creamy Alternatives
For a dairy-free version that still delivers that signature custard layer:
- Use coconut milk (full fat!) instead of regular milk
- Swap butter for melted coconut oil
The cake comes out with a subtle tropical flair – perfect for when you want pumpkin magic with a vacation vibe! Just note the layers might be a bit softer, so extra chilling time is key.
The beauty of this recipe is how forgiving it is – once you’ve mastered the basic magic, feel free to get creative with your own variations. I’d love to hear what delicious twists you come up with!
Nutritional Information
Okay, let’s talk numbers – but don’t worry, this pumpkin magic cake is worth every delicious bite! Here’s the scoop per serving (about 1/8th of the cake):
- 280 calories – perfect for treating yourself without the guilt
- 25g sugar – just sweet enough to satisfy that pumpkin spice craving
- 5g protein – those eggs do double duty for structure and nutrition
- 12g fat – mostly from the butter and eggs that make it so rich
- 38g carbs – because cake should be celebratory!
Now, full disclosure: these are estimates based on my exact ingredients. Your values might dance around a bit depending on your pumpkin puree brand or whether you use that extra pinch of spice (no judgment here!). The magic stays the same no matter what – it’s all about enjoying that first incredible bite when the layers melt together on your fork!
Frequently Asked Questions
After sharing this pumpkin magic cake recipe with hundreds of friends (and their friends’ friends!), I’ve heard all the questions. Here are the ones that come up most often – with my hard-earned answers from years of baking this magical dessert!
Can I use fresh pumpkin instead of canned puree?
Absolutely! I love using homemade pumpkin puree when I’m feeling extra ambitious. Just roast a sugar pumpkin (the small, sweet ones – not those giant carving pumpkins!) until fork-tender, scoop out the flesh, and puree until smooth. The key? Strain it through cheesecloth for several hours to remove excess moisture – you want it thick like the canned stuff. Fun fact: my Halloween pumpkin carvings often end up as next-day cake ingredients!
Why didn’t my layers separate properly?
Oh honey, don’t panic! This usually happens for three reasons:
Overmixing: You got too enthusiastic with the whisk (we’ve all been there!)
Wrong pan size: An 8-inch pan is magic – larger pans spread the batter too thin
Oven too hot: Those layers need gentle heat to form properly
The cake will still taste amazing – just call it a “pumpkin custard cake” and no one will know the difference! Next time, go gentler on the mixing and double-check your oven temp with a thermometer.
Can I make this ahead of time?
You’re speaking my language! This cake actually gets BETTER after a night in the fridge – the flavors deepen and those layers set up perfectly. I often bake it the day before an event, cover it tightly, and let it chill overnight. The custard becomes extra creamy and the spice flavors really pop. Just remember – no peeking until it’s completely cool!
My cake sank in the middle – what went wrong?
First, take a deep breath – it’s still edible! This usually means we pulled it from the oven too soon. That center needs to be just set with a slight jiggle (think firm Jell-O, not wobbly pudding). Next time, give it 5-10 more minutes if you’re unsure. Pro tip: if it does sink, fill the dip with whipped cream and call it “pumpkin magic pudding cake” – instant save!
Can I double this recipe?
I love your enthusiasm! But here’s the thing – magic cakes work best in small batches. Doubling can mess with the delicate chemistry that creates those perfect layers. Instead, I recommend baking two separate cakes (more magic to share!). If you must try a larger version, use two 8-inch pans and add 10-15 minutes to the baking time. Just promise me you’ll watch it like a hawk – oven temps can vary!
Still got questions? Drop them in the comments below – I’ve probably made every mistake possible with this cake and lived to tell (and eat) the tale!
Share Your Pumpkin Magic Cake
Nothing makes me happier than hearing about your pumpkin magic cake adventures! Whether it turned out picture-perfect or had its own “unique character” (we’ve all had those baking moments!), I want to see your creations. Did you add a special twist with extra spices? Maybe your kiddos helped decorate with whipped cream ghosts? Or perhaps you accidentally created a new flavor combo when you grabbed the wrong ingredient (been there!)?
Leave a comment below telling me how your magic cake turned out – the good, the messy, and the deliciously imperfect! Did your family do the same amazed gasp when you sliced into it like mine always does? Snap a photo if you can – I live for those “look what I made!” kitchen victory shots. And if you have any brilliant tips you discovered along the way, share those too! Your baking wisdom might just help someone else create their own magical moment.
This recipe has connected so many of us through shared stories of ovens that bake unevenly, of layers that didn’t quite separate (but still tasted amazing), and of that proud feeling when you pull off something that looks fancy but was secretly easy. However your pumpkin magic cake journey goes, I’m cheering you on – because every baker deserves to experience this little bit of kitchen sorcery! Love layered desserts and seasonal sweets? Follow us on Facebook for more deliciously creative recipes!